Showing posts with label farming. Show all posts

Friday, July 26, 2013

Raising Laying Hens From Chicks: A Step By Step Guide

STEP ONE: Things To Gather BEFORE your chicks arrive.  Yes.  BEFORE.

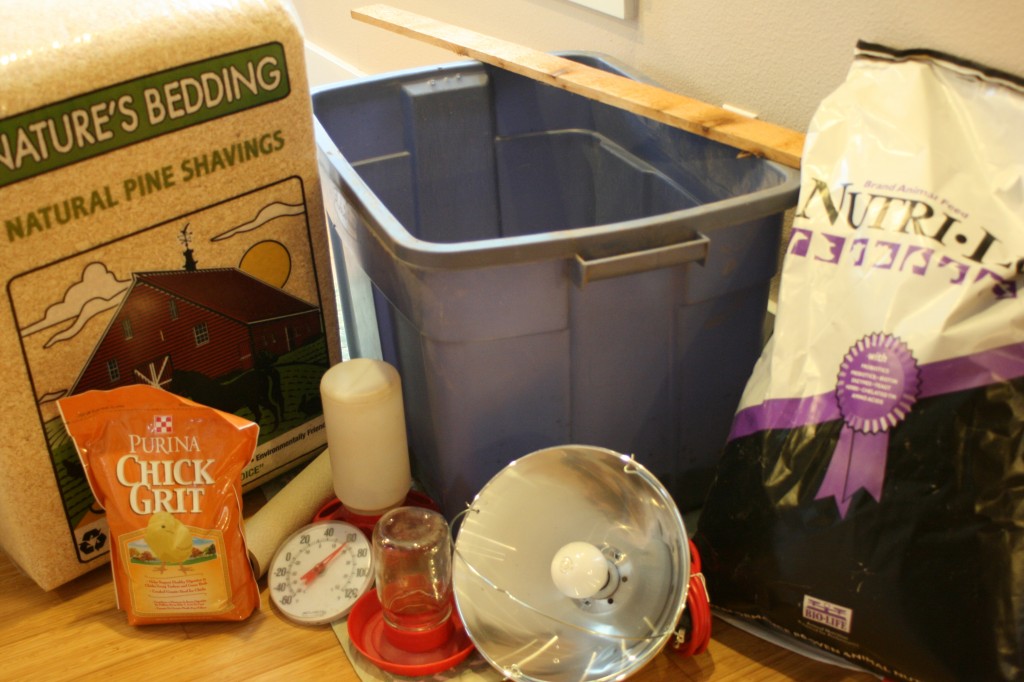
1) A brooding box/pen/cage.  You can start with a big plastic tub for 25 chicks, which they’ll outgrow in a week.  It can be used  to hold 40-50 pound bags of feed later.  If you have 3-6 you can keep them here for a 2-3 weeks.


2) Chick feed.  It is important to feed your chicks food intended for chicks and not adult birds.

3) Chick grit.  Chickens typically consume dirt and pebbles as they eat, and these are necessary to help break down their food.  Since chicks are not outside for the first 5 weeks (in our case more like 6-8 since we get them in December) they need grit as a supplement added to their food.  Adult birds that are not raised outside will continue to need a grit supplement.

4) Pine shavings or equivalent. Avoid hardwood shavings like oak, as they can be toxic to chicks.  Avoid shredded newspaper, too, though some people use it.  The ink will dirty your chicks, and it seems an unsatisfying bedding choice for new chicks.

5) Paper towels (non-bleached, plain) for the first 2 days.  If you use newspaper be sure to shred it or chicks will slip on the surface.  Slipping is problematic for proper foot development, so go with paper towels.

6) Water and food dispensers.  Those pictured are specifically for chicks.  They will need something bigger in about 5 weeks.  Though again, if you only have three or four birds, the watering can pictured could work if you swap out a quart jar, but even with a quart jar you’ll have to fill it frequently.

7) Light with a 100 watt bulb if chicks will start in your home somewhere (a laundry room works well), or some heated area.  Otherwise, get a heat lamp as well as a white light.  If you plan to put them in your garage in early spring, you will still want a heat lamp.

8) Thermometer (not essential, but handy).

STEP TWO: Set up before the chicks arrive

1) Place about 1/2 inch of shavings in the bottom of your brood space and cover with one layer of paper towels. If you have a cage, lay a plastic bag or old shower curtain down to protect the floor.  With our tub we put an old towel down.  Partly it marks off chick space from other space.  Consider “chick space” dirty. That is, hands should be washed well after entering “chick space”….

2) Put the filled feeder and water directly on the bottom of your brood area for a day.  Once the chicks are actively eating and drinking, put a block of wood under the feed and water to raise them a bit.  This will keep them cleaner. Separating the water and feed will also help keep both cleaner.

3) If chicks are brand new–that is, they have not had anything to eat or drink yet (most likely if they have been mailed to you), then mix 1/4 c. sugar with a 1 quart of warm water to dissolve.  Use this water the first couple of days.  The sugar will give the hungry and thirsty chicks an energy boost, and they’ll be inclined to drink because–well, sugar water is just SO tasty!  After the second day use tap water.  If chicks come from a farm and feed type store and are at least a few days old you can omit the sugar water.


STEP THREE: When Chicks Come Home

1) If the chicks have come in the mail they will be stressed, thirsty, and cold.  So take them out of the box one at a time, dip their beak in your sugar water and set them down by the water.  I keep the feed next to the water the first couple of days to be sure they find them both.  You may need to dunk their beaks in the food too, if they aren’t finding it.  Check them periodically to be sure they are eating and drinking.  Occasionally you’ll need to double dip (I think of this as a baptizing of sorts–calling these chicks to life…) a chick who only wants to sleep.  BUT sleeping is what they will do a lot the first couple of days.

If the chicks are coming from Wilco (or equivalent), they will be excited to explore their new area, and all you need to do is show them the water and feed.  They will likely find them on their own, but set them down in front of it regardless, especially if your feeder looks different from the one in the store.

2) Hang your white light over the brood box. We put a screen on top of our tub and set the light on the screen–you can figure out another system, but you will want to cover the brood box by week 3.  Follow these guidelines for temperature:
The first week keep the area beneath the light between 90-95.  Every week decrease that 5 degrees by raising the light about 3 inches.  By week five you’ll be at about 75 degrees, and depending on time of year, may not need a light anymore.  If it is winter, keep their space above 60 at night for another few weeks until their chick fluff is fully replaced by feathers.

Chicks will communicate whether they are too hot or too cold by how they cluster.  They will be inclined to collapse into a pile to sleep, but if they spend nearly all the time heaped up under the light they are too cold. If they are spread out away from the light they are too hot.  If they are panting, they are too hot. In those cases, raise the light, or if you are using a heat lamp, switch to a 100 watt white bulb. This is why a thermometer is optional.  Chicks communicate very well.  Especially at this stage.

STEP FOUR: Things to Check in the First Week:

1) Observe to see that they are all drinking and eating. Feel free to hold them, but not overly much the first week.  But handle them after that if you want hens that will tolerate petting!  Certain breeds are also more amenable to petting than others.

2) When you pick them up, check their vent to be sure it is not plugged with poop.  (Anatomy lesson: the vent is used for everything: pee-poop–urine and feces are mixed for chickens, and egg.  Maybe disgusting, but true.)  We only had this happen with one shipment–which arrived in bad shape.  We lost five of the chicks in the first 24 hours, and about 5 of them had plugged vents over the first week.  To clear, soak their bum in a small bowl/container of warm (not hot) water.  Try not to get any more of the chick wet than is necessary.  The poop plug will soften so that you can scrap it away gently.  Dry chick and immediately put back in warm brood box.  I used a yogurt container which I then recycled.  THIS BEARS REPEATING: ALWAYS WASH YOUR HANDS AFTER HANDLING YOUR CHICKS. Not only when you’ve been cleaning pasty butts!

3) Turn off the white light every day 2-4 times for about 20 minutes at a time so they are not constantly under white lights.  Imagine if you had to live and sleep under a bright white light 24/7…!

4) Add chick grit to the feed after the first few days. Mix your feed and grit together at this point.  The ratio of feed to grit is 20:1.  So 20 pounds of feed mixed with 1 pound of grit will keep you from having to make the calculation every time you feed them.

5) You’ll change the paper towels a couple of times a day the first day or two on account of the poop.  Once you stop using paper towels, add new shavings on top of the old ones every few days as needed. If you are using a heat lamp you’ll notice the lamp dries the poop and reduces the smell.  If you are using a white lamp, you will likely want to replace the shavings every few days.  When the smell is strong–it’s time to replace them.  For your sake, but also for the chick’s health.

STEP FIVE: Things to Do in Week Two or Three:


Mostly Continue what you’ve been doing, but you will notice they will muck up their water (so change it frequently–and depending on how many chicks you have, you might want to graduate to a quart jar for water), and you’ll be surprised how quickly they will go through feed.

Clean their water jar at least once a week with a vinegar/water solution.  You’ll notice it gets to feeling slimy, and vinegar will keep it clean.

By the end of week two move  birds to a bigger space.  So add a heat lamp at that point, and leave both a heat lamp and a white light on during the day, and then turn off the white light at night. If you just have 3-4 chicks you’ll likely be able to keep them in your original space for the full 5-6 weeks unless the smell drives them or you out of the house!  Better them than you!  Since it takes five to six weeks for them to get their warmer set of feathers, heat continues to be an issue even after they appear  to be awkward gawky teenagers.


Add clean shavings every few days on top of the old ones.  As they get older (and more feathered) Open up a space for them to see into the garage, and eventually open the front up most of the way during the days before we move them from here to the hen house.

http://www.survivalistdaily.com/raising-laying-hens/


Wednesday, June 12, 2013

Heart of the Ozarks Farmers Market - West Plains, Missouri

There will be cucumbers and fresh green onions at Heart of the Ozarks farmers market today. We are open 11 am - 4 pm in the parking lot at Lost Treasures, between Dairy Queen and Highland Dairy.

1755 S. US Hwy 63, West Plains, MO.
417-293-8306/417-293-7904

Tuesday, April 30, 2013

HOW TO: Cook Corn in Husks


Instructions:


1. Remove a few of the outer husks that might be dirty.

2. Cut the bottoms off of the corn. Be sure to cut above the part of the cob where the husk is attached. It would be above the part of the cob where it starts to round down.

3. Place a moist paper towel on the bottom of the microwave or on top of the carousel and place the corn on the paper towel.

4. Use this guide for your cook time. Remember the cooking time can vary for each microwave.

1 ear - 2 minutes
2 ears - 3 to 4 minutes
3 ears - 5 to 6 minutes
4 ears - 7 to 8 minutes
6 ears - 8 to 9 minutes

5. After cooking, let the corn sit about 3 minutes. It will continue to cook and will be cooler and easier to handle.

6. Pick the cooked corn up by the top (you might want to use an oven mitt if it is too hot to handle) and squeeze and lightly shake out the ear of corn. It should just slide out leaving the silk and all of the husks intact.

Friday, April 19, 2013

DIY - How to: Keep Birds Out of Your Strawberries


Paint a bunch of small stones and place them in and around the strawberry plants. The birds will dive for them and learn they are NOT nice and juicy.  By the time the berries are ripe the birds will not bother the real fruits.
Collect some strawberry shaped stones. Wash well with soap and water and let dry overnight.

When it's time to paint, I like to work on about a dozen at a time so that the paint on the first one is dry by the time I'm finished that particular step on the 12th. one. I use acrylics.

 Step 1 of painting:
To achieve a bright red result, undercoat stone with white.Paint half your stone at a time,let dry, turn over and paint other half.One coat of white is sufficient. The white undercoat makes the red "pop out".
Basecoat with any red of your choice, letting the first side dry before continuing to the other side.  You will probably need two coats of red.
In these examples I used Delta Ceramcoat Fire Red.
Look at your "berry" and decide which end would be best suited for the hull. One end is usually less pointed and that is where the hull would go. With Hauser Medium Green, or any medium green of your choice, base in the hull, making 6 or 7 pointed leaves that come about 1/4 to 1/3 of the way down the strawberry. Try not to make your hull so small that you can't see it from a side view.
With Hauser Dark Green, or any dark green, outline each hull leaf, put in a central vein on each, and add a circle at the top center.
With Hauser Light Green, or any light green, randomly add  highlights here and there.  No need to wash out your brush between greens..mixing them is more interesting.
With Black, using a liner brush,randomly add the little pockets where the seeds grow.
Avoid the temptation to add too many.
Also, keep them small so they don't end up looking like watermelon seeds.
 Again, using a liner brush, place a dot of off white in each little pocket to represent the seed.  I used Ceramcoat Light Ivory.
The final step is to give your berry 2 or 3 coats of varnish..either in spray form or with a wipe-on product called Final Coat.  The varnish protects the paint from chipping,gives depth to the colour,and it keeps the paint from sticking and lifting when you pile the berries in a basket.


Thursday, April 11, 2013

What's For Dinner - Grilled Ribeye & Roasted Broccoli


Grilled Ribeye & Roasted Broccoli


Ingredients (Steak):

Ribeye steaks (1 per person)
Salt
Pepper, if desired
Process (Steak):

Remove steak from refrigerator 20-30 minutes before grilling, to bring up to room temperature.
Preheat grill until it reaches 500 degrees.
Sprinkle salt on each side of the steak.
Place steak on grill, cook 6-7 minutes per side (until desired internal color is achieved).
Allow steak to rest 5 minutes before serving.

Ingredients (Broccoli):

3-4 cups broccoli florets, washed
2 tablespoons olive oil
Salt and pepper to taste
Process (Broccoli):

Preheat oven to roast at 400.
In a Pyrex dish, toss broccoli in olive oil, salt and pepper.
Roast for 30 minutes, or until the edges are crispy.
Serve.

Wednesday, April 10, 2013

What's For Dinner - Chicken Wild Rice Soup


Chicken Wild Rice 


Prep: 10 min. Cook: 40 min. Yield: 14 Servings

Ingredients
2 quarts chicken broth
1/2 pound fresh mushrooms, chopped
1 cup finely chopped celery
1 cup shredded carrots
1/2 cup finely chopped onion
1 teaspoon chicken bouillon granules
1 teaspoon dried parsley flakes
1/4 teaspoon garlic powder
1/4 teaspoon dried thyme
1/4 cup butter, cubed
1/4 cup all-purpose flour
1 can (10-3/4 ounces) condensed cream of mushroom soup, undiluted
1/2 cup dry white wine or additional chicken broth
3 cups cooked wild rice
2 cups cubed cooked chicken
Directions
In a large saucepan, combine the first nine ingredients. Bring to a boil. Reduce heat; cover and simmer for 30 minutes.
In Dutch oven, melt butter; stir in flour until smooth. Gradually whisk in broth mixture. Bring to a boil; cook and stir for 2 minutes or until thickened. Whisk in soup and wine. Add rice and chicken; heat through. Yield: 14 servings (3-1/2 quarts).
Nutritional Facts
1 serving (1 cup) equals 154 calories, 6 g fat (3 g saturated fat), 27 mg cholesterol, 807 mg sodium, 14 g carbohydrate, 2 g fiber, 10 g protein.

Originally published as Chicken Wild Rice Soup in Taste of Home's Holiday & Celebrations Cookbook Annual 2001, p75


Thursday, March 28, 2013

Start a 1 Acre Self-Sufficient Homestead

We wanted to share this great information from Mother Earth News on how to start a 1 Acre Homestead. There are some great ideas here. 

We have the land for sale. All it needs is you! Contact us Today!


Your 1-acre homestead can be divided into land for raising livestock and a garden for raising fruits, vegetables, plus some grain and forage crops. 


Everyone will have a different approach to keeping a self-sufficient homestead, and it’s unlikely that any two 1-acre farms will follow the same plan or methods or agree completely on how to homestead. Some people like cows; other people are afraid of them. Some people like goats; other people cannot keep them out of the garden. Some people will not slaughter animals and have to sell their surplus stock off to people who will kill them; others will not sell surplus stock off at all because they know that the animals will be killed; and still others will slaughter their own animals to provide their family with healthy meat.

Read more: http://www.motherearthnews.com/modern-homesteading/self-sufficient-homestead-zm0z11zkon.aspx#ixzz2Or9G0TxS

Wednesday, March 27, 2013

Regrow your green onions!


Did you know you can regrow your green onions?? You can cut off the roots and 

put them in water, then the roots will absorb the water and start to grow a new 

green onion. It takes a good 2-3 weeks for the green onion to grow completely 

so you can use it again, but it grows a whole new one!!!

Monday, March 25, 2013

Homemade dishwasher detergent cubes with just four ingredients


Homemade dishwasher detergent cubes with just four ingredients! 
1 Cup Borax, 1 Cup Washing Soda, 1/4 Cup Epsom Salt, Lemon Juice. 


Ingredients:
1 Cup Borax
1 Cup Washing Soda
1/4 Cup Epsom Salt
Lemon Juice


First, start by mixing all the powders together. Make sure they get mixed up good because you want it evenly spread through all the cubes you're going to be making. If you're not sure about the Borax, just eliminate that from the recipe, it won't harm it at all.

When everything was mixed,  put a cup of the powder into a separate bowl and then pour in a little bit of lemon juice. For one cup of powder used 4 tablespoons of lemon juice. You don't want it to be dry but you don't want it soaking wet either. 4 tablespoons made it a little wet and sticky which is exactly what you want.

The lemon juice will foam when it hits the powder. Mix it all in and get it a little sticky. When finished with that, start to add it to the ice cube trays. Put in the amount and pat it down.

Now, when you're all done, set the cubes up on the window sill in the kitchen so that it would get a lot of sun and therefore dry quicker. Letting it sit overnight will make it nice and hard. In the morning flip the trays over and knock the cubs out.


Thursday, March 21, 2013

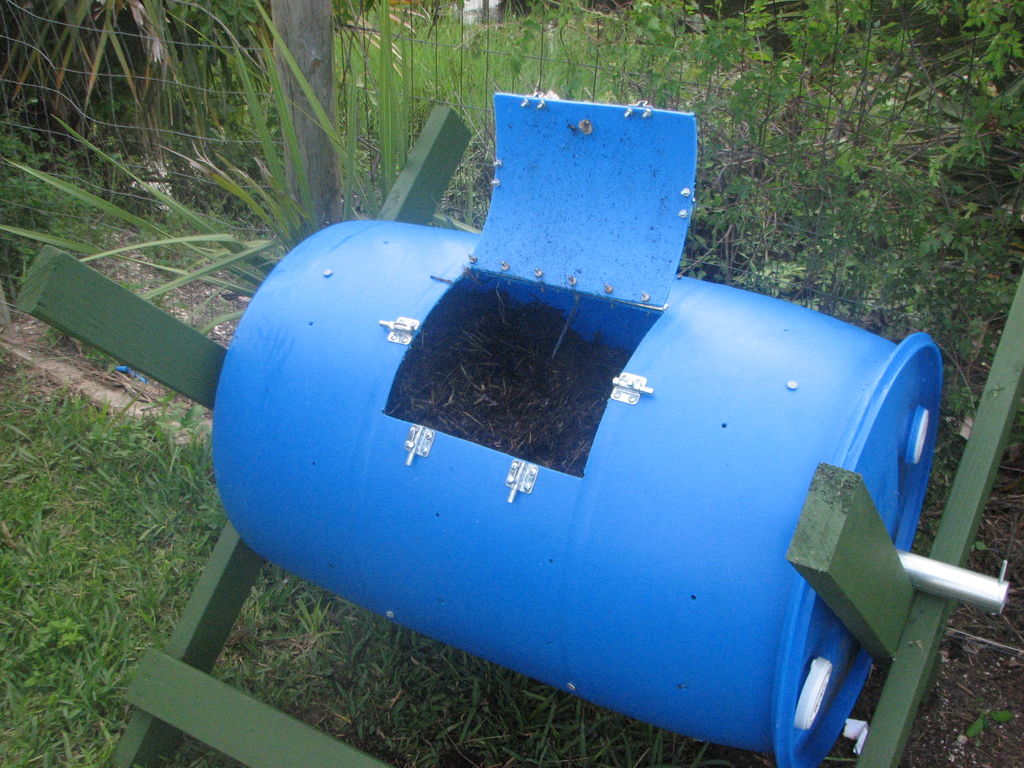
Compost Bin


Compost Bin  

by ic517

www.instructables.com

Step 1: Materials

3 2x4 x 8 pressure treated
1 galvinized chain link fence post
4 3.5inch 1/4 bolts with washers and nuts
6 or 8 6" 60d nails
one 55 gal barrel (must be food grade)
4 latches
one piano hinge
one box of 10-32 3/4" nuts and bolts ( make sure they fit your hinges and latches)
paint if you want . I use barn paint from tractor supply co . its cheap and it doesn't require primer!
now I bought most of my materials but you can use what ever you have on hand also. the whole project only cost me 50 dollars so its not that expensive any way


Step 2: Assembly

First cut 2x4s in half
take 2 2x4s measure and make a mark half way down both of them . then center them and bolt ( you can use nails but bolts work better) them together.
repeat for other side.
you should have two giant X's
it doesn't matter which way they go,so pick one side as the bottom measure up 3 inches from each foot for the bottom braces.
now attach your other 2 boards with nails or screw them together.
your frame is now done and you can start to work on the barrel.
you can cut your bottom braces a few inches longer than the barrel for a better fit but you don't have to.

Step 3: Post hole

now get a hole saw to match your post and drill in the center of each end of the barrel.drill a hole and put a bolt through the end to keep it from sliding off the frame. you'll also need to trim the post to length. 

.

Step 4: The lid

This is the most difficult part of the whole project take your time to cut , drill and line everything up.
I use 4 latches because the heat from the compost can warp the lid and the plastic is somewhat flexible anyway. the piano hinge adds stability also. start by marking the door out. I used a carpenters pencils , its a little hard to mark mark on the plastic.
then drill 4 1/4" holes in the corners.
cut out door with a jig saw . i made mine big enough for my shovel the fit in just use good judgement and dont make it to big or small.
first drill and bolt the hinge to the barrels first.
now drill and bolt the lid on . drill two holes and bolt them together first just on case they don't line up. the drill bit will try to slip on the plastic so start your drill slowly.
make a handle out of what ever , a simple finger hole would work.
now drill and attach the bolt side of the latch first then slid bolt open and use it to line up bolt reciever. close each bolt when you go to install the next one so the stay lined up. take your time aand it should be ok


Step 5: Ventilation holes

on the opposite side of barrel from the lid mark off 4 evenly spaced 1/4 holes across the barrel.then measure 6 inches down from each hole till you all gone all the way around. just make sure it has some ventilation. this would be a minimal amount . Now randomly drill some hole for the spikes . drill a hole a little small than the spike and just nail them in. these help brake up the material when you rotate the barrel speeding up the composting. You should use 4 to 8 spikes what ever works best . you can always pull them out.

Step 6: Add compost!!!!


the only other thing you could do is paint it black . they make paint that will stick to plastic. I live in south Florida so that's really not necessary but if you live in northern climates you might need to find a good sunny spot and place it there! the advantages of this barrel composer are quite a few. its quick, cheap and effective. no bugs or rats, almost no odor. you can use it in a very small yard and not bother the neighbors. 
I square foot garden ( mel is a genius ) and buying fertilizer and compost can add a lot of expense you don't need. I save a lot of money growing my own food and you would amazed how much food you can grow this way .good compost can double your harvest!


Friday, January 25, 2013

Ozarks Gardening Made Easy with Raised Beds! (How-To)

Materials for a raised garden bed
  • One 6-foot-long 4-by-4 ($15) (Cedar or Redwood is best for rot resistance & Aesthetics)
  • Six 8-foot-long 2-by-6s ($75) (Cedar or Redwood is best for rot resistance & Aesthetics)
  • 32 3½-inch #14 wood screws and 16 ½-inch #8 wood screws ($29)
  • One 4- by 10-foot roll of ¼-inch-mesh hardware cloth ($15)
  • 32 cubic feet (1 1/5 cu. yd.) planting mix ($25 in bulk or $100 in bags)

 Everyone in the Ozarks knows that when you're out to garden you best get ready to do a lot of "rock" gardening, because our earth is so rough & tumble full of clay, rock and sand that it's hard to get good crops out of it unless you take years or many dollars worth of top soil, manure and compost to get it worth planting in. (Not counting tomatoes which seem to love our soil type & as does our native flora).

The above materials should be enough to create one raised bed  (see our previous blog post on how to make an insulated raised garden bed.)


With a table or power saw, cut the 4-by-4 into four 16-inch-tall corner posts. Cut two of the 2-by-6s in half. Cut the 1-inch PVC pipe into four 12-inch-long pieces and the ½-inch PVC pipes into 6-foot-long pieces. Assemble pieces on a hard, flat surface by nailing/drilling the 2-by-6's and their halves to the four corner posts you cut to make a approx. 8 ft long box. After marking off an area and placing the box where you want it to be in your garden, place the cloth (or chicken wire) on the ground to keep out moles, then fill the bed with a good healthy mix of soil (home mixes that are comprised of compost such as manure, leaves, veggie/fruit leavings are excellent- Goat, Rabbit, Horse & Donkey manure are great for this.) to where it's just about 1-1.5" from the top of the boards. You should be able to get about 6 rows of leaf lettuce out of each box, but the needs of each crop you intend to plant will vary in spacing requirements for a good healthy harvest. (Allot space for poles or supports for beans, tomatoes, etc).

Click Here For a Visual Step-By-Step on how to assemble a raised bed.

Some design ideas we found online: (good to doodle these out during Winter to help get organized for Spring!)

Remember, if you want a custom and different design your materials will change compared to what we've shown above, so allot for the changes for your own design.


Monday, January 21, 2013

Getting the Garden ready for Spring planting without using Gas, Electricity or Oil powered machines. Off-Grid Goodness!


  While browsing online, I found a good source of tips and information that will help those off-grid or living the "simple life" to save some money and get the garden ready for Spring planting that's just a few months away.

"Once you have the grass mowed and the weeds chopped down, the next step is to break up the soil for planting. Heavy duty tools like a Broadfork can make this job easier. The 20 inch wide fork is specially sharpened to take big bites from the ground. Extra-long 60 inch handles give you lots of leverage to break the soil loose. There’s much less bending over than a hoe requires, and no need to chop or hack at the soil. Best of all, the dirt is left loose and pliable, not packed down by heavy power equipment.

Once the soil is broken up, the next step is to cultivate. Instead of using a bulky gas-powered tiller to over work your soil, you can create a smooth planting bed with an easy-to-use rotary cultivator. To use this tool, you simply push it in front of you as you walk down the rows of your garden. The wheel breaks up the soil and works in your peat moss or compost while you get some exercise.

Once your garden is cultivated, it’s time to plant. To keep your rows nice and straight, just drive a one-foot stake at the end of each row and tie a string between them. Then use the string as a guideline.

Dreading the thought of crawling around on your hands and knees to plant all those seeds? No need if you get yourself an old fashioned corn planter. All you have to do is pour the seeds into the cup on the side, push the steel blade into the ground and squeeze the handles. The seeds will drop right where you want them. It’s a very efficient system and allows you to finish a chore that could take hours in just minutes.

If you want butterflies decorating your garden, once you have the seeds in the ground, plant oregano, borage, catnip and hollyhocks between the rows. The colors and scent attract the beautiful creatures. Butterflies also like bee balm, red carnations and begonias.

After planting your garden the natural way, don’t stop there. Make a pledge to water your vegetable plants by hand every day with a good old-fashioned watering can. And instead of relying on pesticides -- which over time can work their way into the ground-water and damage the environment -- to keep the weeds down, get out there every day with a hoe and pull them up.

To keep bugs away, sprinkle a mixture of garlic power and flour on your plants. It works especially well for cabbage flies, but use it sparingly. The mix will get pasty on the leaves if applied too thickly.


( picture gained from here )


OLD TIME GARDEN TIPS
Here’s a trick to keep the woodchucks from stealing carrots from your garden. Fill glass gallon jugs with water and place them around your garden. The woodchucks see their reflections and, apparently thinking it’s another animal, run away. Sounds silly but it works.

If you’d like to force hornets, bees and wasps to move out, try hanging moth cakes on your deck, under the eaves, or anywhere else they like to build their nests. They don’t like the smell so they fly far away and call somewhere else home. "

Article taken from this site.

Tuesday, October 30, 2012

Build a High-Protein Dispenser for FREE Chicken Food!

Found a nice little article that will help all those who have chickens, through the winter and the rest of the year saving you money by feeding natural, and high-protein, and FREE feed to your chickens with a little material found 'round the homestead or farm with a dollar or two thrown in for some minor materials.

The article I gleaned this info from is out of the "Countryside & Small Stock Journal" Vol 96 No. 6 November/December 2012, Page 61, by Jeff Hoard.

Basically the articles author explains how to create a maggot dispenser for your chickens using some simple materials:
  • Flat plywood- to put under dispenser to catch & feed chickens on a clean surface.
  • 5 gal. bucket with lid, bottom cut out but leave a 1" lip around it to hold a round piece of grate or heavy wire mesh.
  • Grate or Heavy Wire Mesh
  • Charge (dead animals, meat scraps, or raw fatty meat products. Don't use anything sick or dying.)
  • PVC Coupler
  • Long piece of ABS pipe
  • Auto Heater Vent Hose
  • Skirting-for little bird & wind barrier
  • Tools for cutting & Drilling
 The author goes on to explain how he put the dispenser together and how it works:

     "I mentioned ours being a deluxe model and I'll explain. The hanger/vent was made out of scrap pipe. At the top I inserted a long piece of ABS pipe. The horizontal hanger is another short pipe that is welded over a hole that I cut in the main vertical pipe. A little below that are two more short pieces of pipe in a v-shape that stick out on each side of the hanging bucket. These serve as bumpers. On the lid of the bucket, I inserted an appropriate sized PVC coupler and a piece of auto heater vent hose, which attaches from there up to the hanging pipe.  This is how the odor is vented up and out at the top of the long ABS pipe. Like the vent system, the "skirt" that was installed on the bucket is certainly not a necessity but does perform some added functions. first, it keeps smaller birds from hanging off the bottom trying to eat their fill. Second, the skirt serves as a wind catch. Third, as the chickens go for the maggots they hit the skirt to hopefully dislodge a few more. Fourth, it helps keep the charge from drying out (very important). I did drill one small hole in the center at the top of the bucket's lid to allow for moisture to be added onto the charge if needed. " (page 63)

The author continues with some tips, "Install the dispenser 20 ft away from the chicken house,  in the shade, this will help draw the flies away from the flock and the flies are immediately drawn to the charge. They then lay their larvae on the charge and the larvae then turn into maggots, hundreds at a time and as they grow larger they get heavier and eventually fall through the grate and onto the plywood below to be gobbled up by a waiting chicken. It usually takes about 5 days for the maggots to start dropping and as long as the charge is refreshed," there is a constant supply of high-protein feed for your chickens and it's free! Chickens can keep laying with this feed and greens for quite some time, without the need for corn scratch!

I scanned the image directly from the magazine in order to show you all what they've created and about how it'll look when finished. It's in pdf form so you will need Adobe PDF viewer to see the file>> PDF


Tuesday, October 2, 2012

How to Salvage Junk and use it for your Garden as a Root Cellar or Veggie Storage!

You might be thinking, "I don't want junk in my garden, why would I salvage junk?!" 

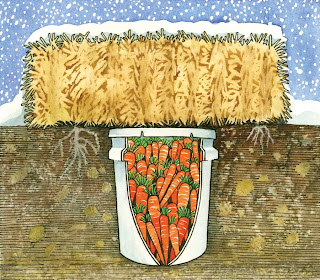
      Well, let me explain, instead of going to the expense of putting in a cellar yourself, whether through paying for physical labor, the cost of cement, etc you can simply bury a large freezer that no longer works and putting straw, raked up leaves or other insulation material on top of tarp that covers the top of the freezer door, this helps keep out critters and keep your stored food insulated in the winter months, or perhaps you need something larger and assuming you have the space for it, ever consider making use of that old, broke-down school bus lying in the local junk yard by burying it up to the rear access doors? Voila, instant Root Cellar! What about that old galvanized trash can out back that's just taking up space, bury that and you have a great little covey for your root veggies, all you need is straw for insulation and it's already rodent-proof!

That get your attention?

 Good!

 Now let me delve further into the method to this madness.


 First off, be mindful of where you stash your garden treasure troves, preferably on the Northern side of your land or home and remember keep safety in mind, disable latches so kids or elderly don't get trapped in by accident.

Bury A School Bus!
http://4.bp.blogspot.com/-1jvcpEFQghE/T4bv1167SvI/AAAAAAAAELI/BHusD_GtZPs/s1600/root-cellar3.jpg


Consider burying a junked school bus, yes you will need to dig a proper sized hole and make sure that the bus is water tight (sealant or wrapping will be needed) and you will also have to allow for access to the rear doors and be sure to board up the windows and seal them for effective insulation. Also, you will need at least two PVC pipe vents for air flow as with any root cellar.

Bury Garbage Cans:


(Image from Mother Earth News )

    You can also use Garbage cans that are sealed or galvanized for smaller storage areas or land allotments, you simply need a can (cut the bottom out or poke holes for drainage), straw and a bit of dirt for the inside in order to place your winter squash and root veggies in, the straw will be used to cover the top of the lid of the trash can in order to insulate it- of course you will need to dig a hole big enough to stick your can into.

To access your veggies, simply remove the tarp (opt), straw bale, and lift off the lid (if you want an additional security from rodents and moisture, put black tarp down over the straw bale on top of the lid and make sure there are drainage ditches on either side of the can and secure the tarp with cement blocks or heavy rocks) and then snatch however many veggies you need for supper and replace your insulation!

Remember to layer leaves or straw between the veggies!


Figure 4. A well box that supports an access hatch above ground level
Here is a good article from Back Woods Home Magazine that shows you how to build a small cold storage bin.

 Bury a Freezer or Refrigerator:
 

Stuff You’ll Need:
Straw Bales
Clear Plastic Sheeting
Plastic Sheeting
Shovel and Pick
Old Deep-freeze Or Refrigerator

Step 1:
Remove motor, shelves and lock from door (so no child can get locked inside).
Step 2:
Dig a hole large enough to hold the deep freeze where the top of the freezer is ground level or slightly below ground level.
Step 3:
Place some rocks in bottom of the hole for drainage.
Step 4:
Place the freezer into hole on its back. The door will open like a lid.
Step 5:
Fill around freezer with soil.
Step 6:
Place vegetables in freezer. Follow storage guidelines for vegetables just as if you were using a cellar.
Step 7:
Cover freezer with a sheet of plastic to keep water from freezing the lid shut.
Step 8:
Place bags of leaves or bales of hay or straw on top of the freezer to help with cold weather.

 Notes: Dig the hole one foot larger than the refrigerator on all sides to create drainage.  The refrigerator should sit just below ground level.  Line the hole with gravel or rocks.   Pour gravel in the space around the sides of the refrigerator.  Run a small vent pipe into the refrigerator for ventilation. Protect from water by covering the top with a large mat, board or other water resistant material.  Cover with bales of hay or straw to insulate. 

The amount of insulation will depend on your cold weather climate, so insulate accordingly, some will need more some less.

Looking for land in Missouri, Arkansas, Texas, or Minnesota in which to start your own homestead or garden in order to try out these new ideas?