STEP ONE: Things To Gather BEFORE your chicks arrive. Yes. BEFORE.
1) A brooding box/pen/cage. You can start with a big plastic tub for 25 chicks, which they’ll outgrow in a week. It can be used to hold 40-50 pound bags of feed later. If you have 3-6 you can keep them here for a 2-3 weeks.

2) Chick feed. It is important to feed your chicks food intended for chicks and not adult birds.
3) Chick grit. Chickens typically consume dirt and pebbles as they eat, and these are necessary to help break down their food. Since chicks are not outside for the first 5 weeks (in our case more like 6-8 since we get them in December) they need grit as a supplement added to their food. Adult birds that are not raised outside will continue to need a grit supplement.
4) Pine shavings or equivalent. Avoid hardwood shavings like oak, as they can be toxic to chicks. Avoid shredded newspaper, too, though some people use it. The ink will dirty your chicks, and it seems an unsatisfying bedding choice for new chicks.
5) Paper towels (non-bleached, plain) for the first 2 days. If you use newspaper be sure to shred it or chicks will slip on the surface. Slipping is problematic for proper foot development, so go with paper towels.
6) Water and food dispensers. Those pictured are specifically for chicks. They will need something bigger in about 5 weeks. Though again, if you only have three or four birds, the watering can pictured could work if you swap out a quart jar, but even with a quart jar you’ll have to fill it frequently.
7) Light with a 100 watt bulb if chicks will start in your home somewhere (a laundry room works well), or some heated area. Otherwise, get a heat lamp as well as a white light. If you plan to put them in your garage in early spring, you will still want a heat lamp.
8) Thermometer (not essential, but handy).
STEP TWO: Set up before the chicks arrive
1) Place about 1/2 inch of shavings in the bottom of your brood space and cover with one layer of paper towels. If you have a cage, lay a plastic bag or old shower curtain down to protect the floor. With our tub we put an old towel down. Partly it marks off chick space from other space. Consider “chick space” dirty. That is, hands should be washed well after entering “chick space”….
2) Put the filled feeder and water directly on the bottom of your brood area for a day. Once the chicks are actively eating and drinking, put a block of wood under the feed and water to raise them a bit. This will keep them cleaner. Separating the water and feed will also help keep both cleaner.
3) If chicks are brand new–that is, they have not had anything to eat or drink yet (most likely if they have been mailed to you), then mix 1/4 c. sugar with a 1 quart of warm water to dissolve. Use this water the first couple of days. The sugar will give the hungry and thirsty chicks an energy boost, and they’ll be inclined to drink because–well, sugar water is just SO tasty! After the second day use tap water. If chicks come from a farm and feed type store and are at least a few days old you can omit the sugar water.


Add clean shavings every few days on top of the old ones. As they get older (and more feathered) Open up a space for them to see into the garage, and eventually open the front up most of the way during the days before we move them from here to the hen house.
http://www.survivalistdaily.com/raising-laying-hens/
1) A brooding box/pen/cage. You can start with a big plastic tub for 25 chicks, which they’ll outgrow in a week. It can be used to hold 40-50 pound bags of feed later. If you have 3-6 you can keep them here for a 2-3 weeks.
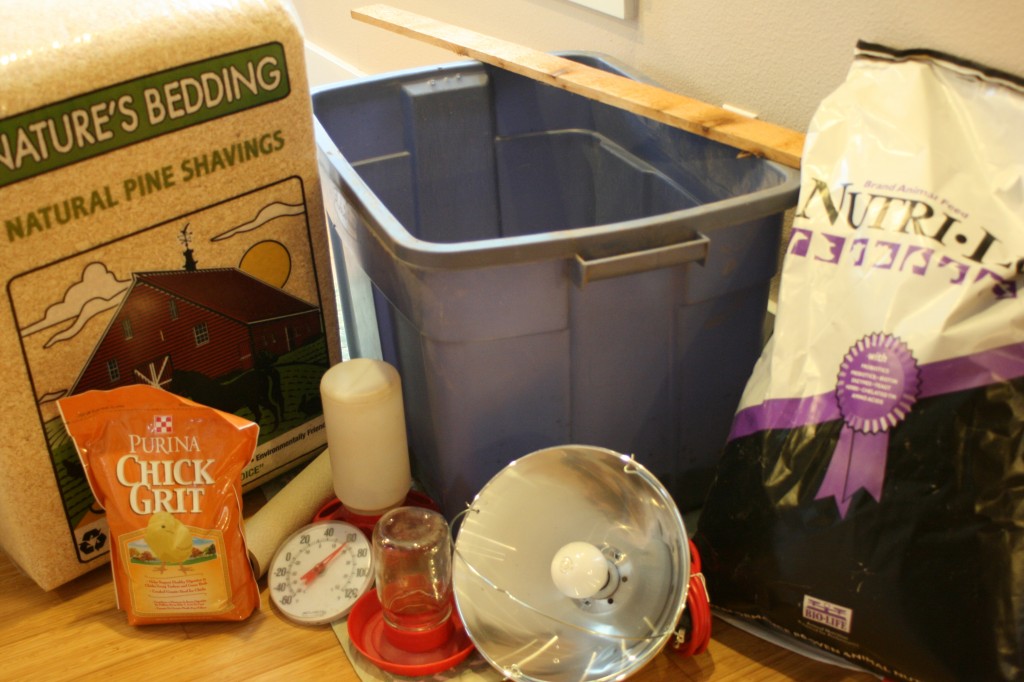
3) Chick grit. Chickens typically consume dirt and pebbles as they eat, and these are necessary to help break down their food. Since chicks are not outside for the first 5 weeks (in our case more like 6-8 since we get them in December) they need grit as a supplement added to their food. Adult birds that are not raised outside will continue to need a grit supplement.
4) Pine shavings or equivalent. Avoid hardwood shavings like oak, as they can be toxic to chicks. Avoid shredded newspaper, too, though some people use it. The ink will dirty your chicks, and it seems an unsatisfying bedding choice for new chicks.
5) Paper towels (non-bleached, plain) for the first 2 days. If you use newspaper be sure to shred it or chicks will slip on the surface. Slipping is problematic for proper foot development, so go with paper towels.
6) Water and food dispensers. Those pictured are specifically for chicks. They will need something bigger in about 5 weeks. Though again, if you only have three or four birds, the watering can pictured could work if you swap out a quart jar, but even with a quart jar you’ll have to fill it frequently.
7) Light with a 100 watt bulb if chicks will start in your home somewhere (a laundry room works well), or some heated area. Otherwise, get a heat lamp as well as a white light. If you plan to put them in your garage in early spring, you will still want a heat lamp.
8) Thermometer (not essential, but handy).
STEP TWO: Set up before the chicks arrive
1) Place about 1/2 inch of shavings in the bottom of your brood space and cover with one layer of paper towels. If you have a cage, lay a plastic bag or old shower curtain down to protect the floor. With our tub we put an old towel down. Partly it marks off chick space from other space. Consider “chick space” dirty. That is, hands should be washed well after entering “chick space”….
2) Put the filled feeder and water directly on the bottom of your brood area for a day. Once the chicks are actively eating and drinking, put a block of wood under the feed and water to raise them a bit. This will keep them cleaner. Separating the water and feed will also help keep both cleaner.
3) If chicks are brand new–that is, they have not had anything to eat or drink yet (most likely if they have been mailed to you), then mix 1/4 c. sugar with a 1 quart of warm water to dissolve. Use this water the first couple of days. The sugar will give the hungry and thirsty chicks an energy boost, and they’ll be inclined to drink because–well, sugar water is just SO tasty! After the second day use tap water. If chicks come from a farm and feed type store and are at least a few days old you can omit the sugar water.

STEP THREE: When Chicks Come Home
1) If the chicks have come in the mail they will be stressed, thirsty, and cold. So take them out of the box one at a time, dip their beak in your sugar water and set them down by the water. I keep the feed next to the water the first couple of days to be sure they find them both. You may need to dunk their beaks in the food too, if they aren’t finding it. Check them periodically to be sure they are eating and drinking. Occasionally you’ll need to double dip (I think of this as a baptizing of sorts–calling these chicks to life…) a chick who only wants to sleep. BUT sleeping is what they will do a lot the first couple of days.
If the chicks are coming from Wilco (or equivalent), they will be excited to explore their new area, and all you need to do is show them the water and feed. They will likely find them on their own, but set them down in front of it regardless, especially if your feeder looks different from the one in the store.
2) Hang your white light over the brood box. We put a screen on top of our tub and set the light on the screen–you can figure out another system, but you will want to cover the brood box by week 3. Follow these guidelines for temperature:
The first week keep the area beneath the light between 90-95. Every week decrease that 5 degrees by raising the light about 3 inches. By week five you’ll be at about 75 degrees, and depending on time of year, may not need a light anymore. If it is winter, keep their space above 60 at night for another few weeks until their chick fluff is fully replaced by feathers.
Chicks will communicate whether they are too hot or too cold by how they cluster. They will be inclined to collapse into a pile to sleep, but if they spend nearly all the time heaped up under the light they are too cold. If they are spread out away from the light they are too hot. If they are panting, they are too hot. In those cases, raise the light, or if you are using a heat lamp, switch to a 100 watt white bulb. This is why a thermometer is optional. Chicks communicate very well. Especially at this stage.
STEP FOUR: Things to Check in the First Week:
1) Observe to see that they are all drinking and eating. Feel free to hold them, but not overly much the first week. But handle them after that if you want hens that will tolerate petting! Certain breeds are also more amenable to petting than others.
2) When you pick them up, check their vent to be sure it is not plugged with poop. (Anatomy lesson: the vent is used for everything: pee-poop–urine and feces are mixed for chickens, and egg. Maybe disgusting, but true.) We only had this happen with one shipment–which arrived in bad shape. We lost five of the chicks in the first 24 hours, and about 5 of them had plugged vents over the first week. To clear, soak their bum in a small bowl/container of warm (not hot) water. Try not to get any more of the chick wet than is necessary. The poop plug will soften so that you can scrap it away gently. Dry chick and immediately put back in warm brood box. I used a yogurt container which I then recycled. THIS BEARS REPEATING: ALWAYS WASH YOUR HANDS AFTER HANDLING YOUR CHICKS. Not only when you’ve been cleaning pasty butts!
3) Turn off the white light every day 2-4 times for about 20 minutes at a time so they are not constantly under white lights. Imagine if you had to live and sleep under a bright white light 24/7…!
4) Add chick grit to the feed after the first few days. Mix your feed and grit together at this point. The ratio of feed to grit is 20:1. So 20 pounds of feed mixed with 1 pound of grit will keep you from having to make the calculation every time you feed them.
5) You’ll change the paper towels a couple of times a day the first day or two on account of the poop. Once you stop using paper towels, add new shavings on top of the old ones every few days as needed. If you are using a heat lamp you’ll notice the lamp dries the poop and reduces the smell. If you are using a white lamp, you will likely want to replace the shavings every few days. When the smell is strong–it’s time to replace them. For your sake, but also for the chick’s health.
STEP FIVE: Things to Do in Week Two or Three:

Mostly Continue what you’ve been doing, but you will notice they will muck up their water (so change it frequently–and depending on how many chicks you have, you might want to graduate to a quart jar for water), and you’ll be surprised how quickly they will go through feed.
Clean their water jar at least once a week with a vinegar/water solution. You’ll notice it gets to feeling slimy, and vinegar will keep it clean.
By the end of week two move birds to a bigger space. So add a heat lamp at that point, and leave both a heat lamp and a white light on during the day, and then turn off the white light at night. If you just have 3-4 chicks you’ll likely be able to keep them in your original space for the full 5-6 weeks unless the smell drives them or you out of the house! Better them than you! Since it takes five to six weeks for them to get their warmer set of feathers, heat continues to be an issue even after they appear to be awkward gawky teenagers.

Add clean shavings every few days on top of the old ones. As they get older (and more feathered) Open up a space for them to see into the garage, and eventually open the front up most of the way during the days before we move them from here to the hen house.
http://www.survivalistdaily.com/raising-laying-hens/