Showing posts with label hobby farm. Show all posts

Friday, July 26, 2013

Raising Laying Hens From Chicks: A Step By Step Guide

STEP ONE: Things To Gather BEFORE your chicks arrive.  Yes.  BEFORE.

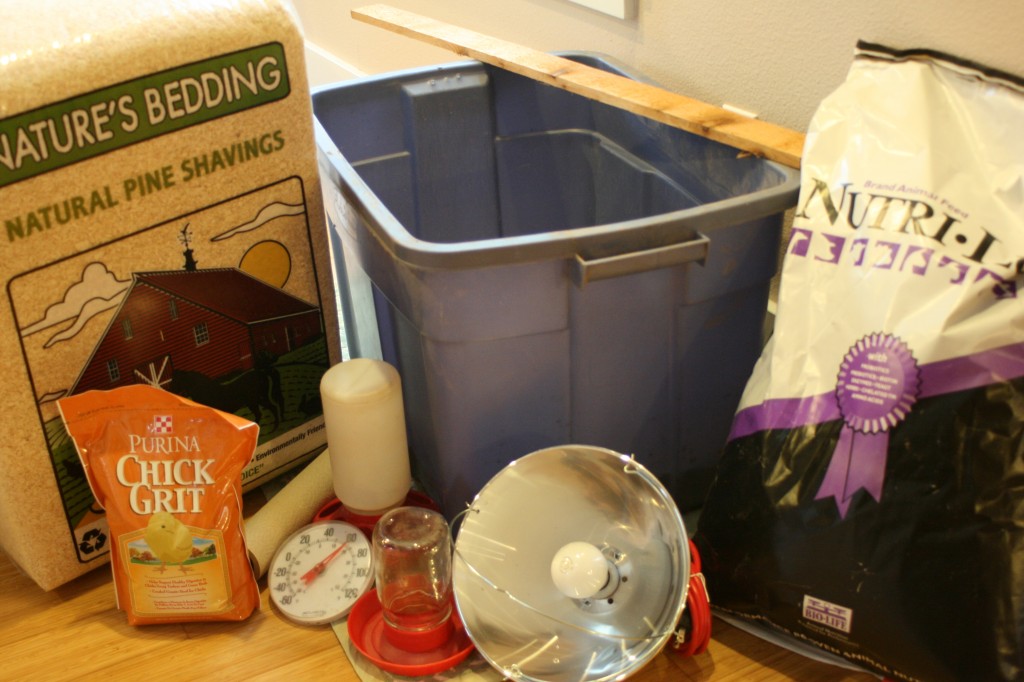
1) A brooding box/pen/cage.  You can start with a big plastic tub for 25 chicks, which they’ll outgrow in a week.  It can be used  to hold 40-50 pound bags of feed later.  If you have 3-6 you can keep them here for a 2-3 weeks.


2) Chick feed.  It is important to feed your chicks food intended for chicks and not adult birds.

3) Chick grit.  Chickens typically consume dirt and pebbles as they eat, and these are necessary to help break down their food.  Since chicks are not outside for the first 5 weeks (in our case more like 6-8 since we get them in December) they need grit as a supplement added to their food.  Adult birds that are not raised outside will continue to need a grit supplement.

4) Pine shavings or equivalent. Avoid hardwood shavings like oak, as they can be toxic to chicks.  Avoid shredded newspaper, too, though some people use it.  The ink will dirty your chicks, and it seems an unsatisfying bedding choice for new chicks.

5) Paper towels (non-bleached, plain) for the first 2 days.  If you use newspaper be sure to shred it or chicks will slip on the surface.  Slipping is problematic for proper foot development, so go with paper towels.

6) Water and food dispensers.  Those pictured are specifically for chicks.  They will need something bigger in about 5 weeks.  Though again, if you only have three or four birds, the watering can pictured could work if you swap out a quart jar, but even with a quart jar you’ll have to fill it frequently.

7) Light with a 100 watt bulb if chicks will start in your home somewhere (a laundry room works well), or some heated area.  Otherwise, get a heat lamp as well as a white light.  If you plan to put them in your garage in early spring, you will still want a heat lamp.

8) Thermometer (not essential, but handy).

STEP TWO: Set up before the chicks arrive

1) Place about 1/2 inch of shavings in the bottom of your brood space and cover with one layer of paper towels. If you have a cage, lay a plastic bag or old shower curtain down to protect the floor.  With our tub we put an old towel down.  Partly it marks off chick space from other space.  Consider “chick space” dirty. That is, hands should be washed well after entering “chick space”….

2) Put the filled feeder and water directly on the bottom of your brood area for a day.  Once the chicks are actively eating and drinking, put a block of wood under the feed and water to raise them a bit.  This will keep them cleaner. Separating the water and feed will also help keep both cleaner.

3) If chicks are brand new–that is, they have not had anything to eat or drink yet (most likely if they have been mailed to you), then mix 1/4 c. sugar with a 1 quart of warm water to dissolve.  Use this water the first couple of days.  The sugar will give the hungry and thirsty chicks an energy boost, and they’ll be inclined to drink because–well, sugar water is just SO tasty!  After the second day use tap water.  If chicks come from a farm and feed type store and are at least a few days old you can omit the sugar water.


STEP THREE: When Chicks Come Home

1) If the chicks have come in the mail they will be stressed, thirsty, and cold.  So take them out of the box one at a time, dip their beak in your sugar water and set them down by the water.  I keep the feed next to the water the first couple of days to be sure they find them both.  You may need to dunk their beaks in the food too, if they aren’t finding it.  Check them periodically to be sure they are eating and drinking.  Occasionally you’ll need to double dip (I think of this as a baptizing of sorts–calling these chicks to life…) a chick who only wants to sleep.  BUT sleeping is what they will do a lot the first couple of days.

If the chicks are coming from Wilco (or equivalent), they will be excited to explore their new area, and all you need to do is show them the water and feed.  They will likely find them on their own, but set them down in front of it regardless, especially if your feeder looks different from the one in the store.

2) Hang your white light over the brood box. We put a screen on top of our tub and set the light on the screen–you can figure out another system, but you will want to cover the brood box by week 3.  Follow these guidelines for temperature:
The first week keep the area beneath the light between 90-95.  Every week decrease that 5 degrees by raising the light about 3 inches.  By week five you’ll be at about 75 degrees, and depending on time of year, may not need a light anymore.  If it is winter, keep their space above 60 at night for another few weeks until their chick fluff is fully replaced by feathers.

Chicks will communicate whether they are too hot or too cold by how they cluster.  They will be inclined to collapse into a pile to sleep, but if they spend nearly all the time heaped up under the light they are too cold. If they are spread out away from the light they are too hot.  If they are panting, they are too hot. In those cases, raise the light, or if you are using a heat lamp, switch to a 100 watt white bulb. This is why a thermometer is optional.  Chicks communicate very well.  Especially at this stage.

STEP FOUR: Things to Check in the First Week:

1) Observe to see that they are all drinking and eating. Feel free to hold them, but not overly much the first week.  But handle them after that if you want hens that will tolerate petting!  Certain breeds are also more amenable to petting than others.

2) When you pick them up, check their vent to be sure it is not plugged with poop.  (Anatomy lesson: the vent is used for everything: pee-poop–urine and feces are mixed for chickens, and egg.  Maybe disgusting, but true.)  We only had this happen with one shipment–which arrived in bad shape.  We lost five of the chicks in the first 24 hours, and about 5 of them had plugged vents over the first week.  To clear, soak their bum in a small bowl/container of warm (not hot) water.  Try not to get any more of the chick wet than is necessary.  The poop plug will soften so that you can scrap it away gently.  Dry chick and immediately put back in warm brood box.  I used a yogurt container which I then recycled.  THIS BEARS REPEATING: ALWAYS WASH YOUR HANDS AFTER HANDLING YOUR CHICKS. Not only when you’ve been cleaning pasty butts!

3) Turn off the white light every day 2-4 times for about 20 minutes at a time so they are not constantly under white lights.  Imagine if you had to live and sleep under a bright white light 24/7…!

4) Add chick grit to the feed after the first few days. Mix your feed and grit together at this point.  The ratio of feed to grit is 20:1.  So 20 pounds of feed mixed with 1 pound of grit will keep you from having to make the calculation every time you feed them.

5) You’ll change the paper towels a couple of times a day the first day or two on account of the poop.  Once you stop using paper towels, add new shavings on top of the old ones every few days as needed. If you are using a heat lamp you’ll notice the lamp dries the poop and reduces the smell.  If you are using a white lamp, you will likely want to replace the shavings every few days.  When the smell is strong–it’s time to replace them.  For your sake, but also for the chick’s health.

STEP FIVE: Things to Do in Week Two or Three:


Mostly Continue what you’ve been doing, but you will notice they will muck up their water (so change it frequently–and depending on how many chicks you have, you might want to graduate to a quart jar for water), and you’ll be surprised how quickly they will go through feed.

Clean their water jar at least once a week with a vinegar/water solution.  You’ll notice it gets to feeling slimy, and vinegar will keep it clean.

By the end of week two move  birds to a bigger space.  So add a heat lamp at that point, and leave both a heat lamp and a white light on during the day, and then turn off the white light at night. If you just have 3-4 chicks you’ll likely be able to keep them in your original space for the full 5-6 weeks unless the smell drives them or you out of the house!  Better them than you!  Since it takes five to six weeks for them to get their warmer set of feathers, heat continues to be an issue even after they appear  to be awkward gawky teenagers.


Add clean shavings every few days on top of the old ones.  As they get older (and more feathered) Open up a space for them to see into the garage, and eventually open the front up most of the way during the days before we move them from here to the hen house.

http://www.survivalistdaily.com/raising-laying-hens/


Wednesday, July 10, 2013

Tip for Rose Bushes


Quick tip: 
Flatten a banana peel and bury it under one inch of soil at the base of a rosebush. The peel’s potassium feeds the plant and helps it resist disease. Consider it a nutritional boost for you and your buds.

Wednesday, June 26, 2013

Glow In The Dark Pots For Planting

Buy a flower pot that you really like and use Rustoleum's Glow-in-the-dark paint to paint the pot. During the day, the paint will absorb the sunlight and at night the pots will glow.


Wednesday, May 15, 2013

Heart of the Ozarks Farmers Market - West Plains


Heart of the Ozarks Farmers Market
1755 S. US Hwy 63, West Plains, MO.

417-293-8306/417-293-7904


The market is open Wed from 11am - 4pm. There will be tomato, pepper and other garden plants. There will be plenty of fresh eggs, laundry soap & fabric softener, and yummy baked goods. Don't forget there is also fresh asparagus.

Wednesday, May 8, 2013

Difference in Eggs


The color of the yolk is an indication of the presence of nutrients. The pastured egg on the left is a dark orange color. The organic store egg in the center is slightly less orange. The supermarket egg on the right is paler and might even be white were orange foods and dyes not given to the chickens. By the way, chickens producing organic eggs are mostly raised in barns, not on pasture. Conditions are certainly better than those for the typical battery egg. However, the USDA has determined that the chicken is a vegetarian, and they can be given no animal foods. Chickens are in fact, omnivores, and their eggs will be much healthier if they are getting animal foods. The pastured egg and the organic egg both have two parts to the white, a viscous part around the yolk and then a thinner part around the edges. This is a sign of freshness.

Monday, May 6, 2013

DIY: Easy Fire Starter


Here is an easy DIY fire starter you can make with stuff you normally throw away. Wad up your old dryer lint and stick it inside a toilet paper tube. Easy starter for the fire pit! 

Friday, April 19, 2013

DIY - How to: Keep Birds Out of Your Strawberries


Paint a bunch of small stones and place them in and around the strawberry plants. The birds will dive for them and learn they are NOT nice and juicy.  By the time the berries are ripe the birds will not bother the real fruits.
Collect some strawberry shaped stones. Wash well with soap and water and let dry overnight.

When it's time to paint, I like to work on about a dozen at a time so that the paint on the first one is dry by the time I'm finished that particular step on the 12th. one. I use acrylics.

 Step 1 of painting:
To achieve a bright red result, undercoat stone with white.Paint half your stone at a time,let dry, turn over and paint other half.One coat of white is sufficient. The white undercoat makes the red "pop out".
Basecoat with any red of your choice, letting the first side dry before continuing to the other side.  You will probably need two coats of red.
In these examples I used Delta Ceramcoat Fire Red.
Look at your "berry" and decide which end would be best suited for the hull. One end is usually less pointed and that is where the hull would go. With Hauser Medium Green, or any medium green of your choice, base in the hull, making 6 or 7 pointed leaves that come about 1/4 to 1/3 of the way down the strawberry. Try not to make your hull so small that you can't see it from a side view.
With Hauser Dark Green, or any dark green, outline each hull leaf, put in a central vein on each, and add a circle at the top center.
With Hauser Light Green, or any light green, randomly add  highlights here and there.  No need to wash out your brush between greens..mixing them is more interesting.
With Black, using a liner brush,randomly add the little pockets where the seeds grow.
Avoid the temptation to add too many.
Also, keep them small so they don't end up looking like watermelon seeds.
 Again, using a liner brush, place a dot of off white in each little pocket to represent the seed.  I used Ceramcoat Light Ivory.
The final step is to give your berry 2 or 3 coats of varnish..either in spray form or with a wipe-on product called Final Coat.  The varnish protects the paint from chipping,gives depth to the colour,and it keeps the paint from sticking and lifting when you pile the berries in a basket.


Friday, April 12, 2013

What's for Dinner - Enchilada Casser-Ole!


Enchilada Casser-Ole! 


Ingredients

1 pound lean ground beef (90% lean)
1 large onion, chopped
2 cups salsa
1 can (15 ounces) black beans, rinsed and drained
1/4 cup reduced-fat Italian salad dressing
2 tablespoons reduced-sodium taco seasoning
1/4 teaspoon ground cumin
6 flour tortillas (8 inches)
3/4 cup reduced-fat sour cream
1 cup (4 ounces) shredded reduced-fat Mexican cheese blend
1 cup shredded lettuce
1 medium tomato, chopped
1/4 cup minced fresh cilantro

Directions

In a large skillet, cook beef and onion over medium heat until meat is no longer pink; drain. Stir in the salsa, beans, dressing, taco seasoning and cumin. Place three tortillas in an 11-in. x 7-in. baking dish coated with cooking spray. Layer with half of the meat mixture, sour cream and cheese. Repeat layers.
Cover and bake at 400° for 25 minutes. Uncover; bake 5-10 minutes longer or until heated through. Let stand for 5 minutes; top with lettuce, tomato and cilantro. Yield: 8 servings.
Nutritional Facts
1 piece equals 357 calories, 12 g fat (5 g saturated fat), 45 mg cholesterol, 864 mg sodium, 37 g carbohydrate, 3 g fiber, 23 g protein. Diabetic Exchanges: 3 lean meat, 2 starch, 1 vegetable, 1 fat.

Originally published as Enchilada Casser-Ole! in Healthy Cooking February/March 2009, p37


HOMEMADE MOSQUITO TRAP


Items needed:

200 ml water
50 grams of brown sugar
1 gram of yeast
2-liter plastic bottle

Or US conversion:
1 cup of water
1/4 cup of brown sugar

HOW:
1. Cut the plastic bottle in half.
2. Mix brown sugar with hot water. Let cool. When cold, pour in the bottom half of the bottle.
3. Add the yeast. No need to mix. It creates carbon dioxide, which attracts mosquitoes.
4. Place the funnel part, upside down, into the other half of the bottle, taping them together if desired.
5. Wrap the bottle with something black, leaving the top uncovered, and place it outside in an area away from your normal gathering area. (Mosquitoes are also drawn to the color black.)

Thursday, April 11, 2013

DIY Water Hose Storage / Cleaning Station

This is just the neatest idea & is so handy for the garden! Your diy wash station that is so simple & get's the water hose of the ground. Make it your own.  This example shows a galvanized  pail screwed to a 2 x 4 that is in the ground with a bird house on the top. Roll the hose around the pail & inside a place to store brushes, small garden tools, and a great place to hang a towel! I just love it & is gonna be a summer project for me!

Thursday, April 4, 2013

What's for dinner: Venison Roast


Venison is an excellent lean meat.


Venison Roast


half venison roast
2 carrots chopped
1 cup  mushrooms
half medium sized onion chopped
½ cup chicken broth
¼  cup red wine
2 tbsp Worcestershire sauce
½ tbsp garlic powder
½ tsp cayenne pepper
½ tsp salt
½ tsp pepper
½ tbsp chili powder
1 tbsp minced garlic

1) Chop up carrots, mushrooms, and onion. Place venison roast and vegetables in crock pot.
2) Pour in chicken broth, red wine, and Worcestershire sauce.
3) Season with garlic powder, cayenne pepper, salt, pepper, chili powder, and minced garlic. 
4) Cook on high for about 6 hours. If possible pull apart venison an hour or so before serving.
5) Pull apart roast, season as necessary for added flavor, and enjoy!

Note: If there is too much liquid in the crock pot close to serving time, whisk in a little flour to thicken it up. I continuously added in some extra pepper, cayenne pepper, garlic powder, and chili powder as it cooked for some extra flavor, so experiment as you go along. Don’t take my measurements of seasonings too seriously—just taste test and make it to your liking. That’s the fun in cooking, right? For health purposes try to lay of the salt a little. Your heart will thank you later.

Wednesday, April 3, 2013

The Benefits of Vertical Gardening


What Is Vertical Gardening?
Simply put, vertical gardening is the practice of growing certain vegetable plants up a support to keep them from spreading on the ground. Most vining plants, such as cucumbers, can be grown vertically using a trellis. Growing these plants vertically saves space, and generally promotes more vigorous growth.

The Benefits of Vertical Gardening
As mentioned above, growing plants vertically saves space in the vegetable garden. You can grow more plants in a smaller area by using vertical gardening practices. A plant that would normally take up 4 square feet spread across the vegetable garden, will only take up 2 square feet if vertical gardening is used.
Vertical gardening can also greatly improve your crop production. Keeping vegetable plants off the soil will help prevent soil-borne diseases, and may limit the chances of rotten fruit. If vegetables are allowed to lay on the soil, they can begin rotting on the bottom side due to excessive moisture.
Growing some vining plants up a support also reduces the risk of powdery mildew, and other mildews, by improving the air circulation around the plants. This will also improve access to blooms for bees and other pollinators. Vertical gardening can greatly improve the overall appearance of your garden, because spreading plants will not look so unwieldy.

Tuesday, April 2, 2013

Tips to use recycled plastic jugs in your garden

Here are are few tips to use recycled plastic jugs in your garden! 

ENJOY!


1. Use gallon bottles/jugs and cultivate what you want.. ideal for anyone who lives in an apartment or small area.


2. Cut the bottom off your gallon milk jugs (and save the bottoms ... you'll see why!) and use them as cloches in the garden! Place them over young tomato, pepper, and other plants, to protect them from frost on chilly spring nights.


3. Slice off the bottom inch or two of your milk jugs, and use them as a tray for starting seeds. Use the top sections as cloches, and you've gotten two great uses out of every milk jug! Poke a few holes in the bottom for drainage, add potting soil or seed starting mix, and plant seeds.


4. Don't spend a bushel of cash on upside-down vegetable planters. You can make them from milk jugs.


5. Slice milk jugs at an angle and you have an instant scoop, complete with handle. Just make sure you leave the lid on! This works perfectly for grass seed, fertilizer, potting soil, and even bird seed! For smaller jobs, use half-gallon jugs.


6. For liquid fertilizer, plant food, herbicides, or other chemicals that need mixing with water, use a milk jug! Measure and add the first ingredient to an empty milk jug, set it on a level surface, and use a permanent marker to make a line at the top of the liquid. Write the ingredient name in the space it occupies in the jug. Add other ingredients as needed, one at a time, marking and labeling after each addition. Next time you make the mix, you won't have to measure. Just use the markings on the milk jug! To avoid mixing chemicals that shouldn't be mixed, reserve one milk jug for your plant food, another for herbicides, and so on, and label them clearly.


7. Punch a series of small holes in the top of a gallon or half-gallon milk jug, fill with water, and use in place of a watering can! The half-gallon size works great for children or anyone who can't manage a heavy full gallon. The water comes out slowly, so kids are less likely to drown plants. If you have to transport water to a garden or flower bed, use a solid lid to haul the gallons of water, and replace it with a hole-punched lid once you get there!


8. Gallon milk jugs are big enough to plant tomatoes. Can hang on deck or wall.


9. Poke tiny holes in the bottom of the jug and place next to new plants.


Friday, March 29, 2013

How To Make A Hanging Gutter Garden


 Materials
1 – 8′ PVC white rain gutter cut into 3 32″ sections
6 – PVC white gutter end caps
2 – 1/8″diameter steel cables cut to desired length
6 – Feeney Cross Clamps (see image below)
6 – 1/8″ diameter Feeney steel rods
2 – Galvanized eye hooks
Potting soil and Plants

Tools
Cordless Drill with drill bit set
Hand saw or hack saw
T-square or straight edge
Tape measure
Permanent marker
Level
Eye protection


1. Determine the center of your gutters and draw a reference line (otherwise your gutter won’t hang right).
2. Mark and drill the holes for the steel cable rods. Find a drill bit the same diameter as the cable to minimize the wiggle room.
3. Space drill holes a few sizes larger to make sure you get good drainage (plant roots hate sitting in water for long periods of time).


1. Locate a spot that gets at least 4 hours of sun. 
2. Drill pilot holes (a hole slightly smaller in diameter than the screw diameter) to make screwing in the eye hook a lot easier. Make sure the holes are the same distance as the steel cable so they hang straight down.
3. Slide the gutters through the holes and secure them with the cross clamps at your desired heights. 
4. Secure the gutter with the cross clamps and half circle steel rods.


Now you’re ready to fill it with organic potting soil and plant them with your choice of shallow rooted plants.

Special thanks to Goods Home Design.
http://goodshomedesign.com/hanging-gutter-gardenhow-hanging-gutter-garden/


Thursday, March 28, 2013

Start a 1 Acre Self-Sufficient Homestead

We wanted to share this great information from Mother Earth News on how to start a 1 Acre Homestead. There are some great ideas here. 

We have the land for sale. All it needs is you! Contact us Today!


Your 1-acre homestead can be divided into land for raising livestock and a garden for raising fruits, vegetables, plus some grain and forage crops. 


Everyone will have a different approach to keeping a self-sufficient homestead, and it’s unlikely that any two 1-acre farms will follow the same plan or methods or agree completely on how to homestead. Some people like cows; other people are afraid of them. Some people like goats; other people cannot keep them out of the garden. Some people will not slaughter animals and have to sell their surplus stock off to people who will kill them; others will not sell surplus stock off at all because they know that the animals will be killed; and still others will slaughter their own animals to provide their family with healthy meat.

Read more: http://www.motherearthnews.com/modern-homesteading/self-sufficient-homestead-zm0z11zkon.aspx#ixzz2Or9G0TxS

Friday, January 25, 2013

Ozarks Gardening Made Easy with Raised Beds! (How-To)

Materials for a raised garden bed
  • One 6-foot-long 4-by-4 ($15) (Cedar or Redwood is best for rot resistance & Aesthetics)
  • Six 8-foot-long 2-by-6s ($75) (Cedar or Redwood is best for rot resistance & Aesthetics)
  • 32 3½-inch #14 wood screws and 16 ½-inch #8 wood screws ($29)
  • One 4- by 10-foot roll of ¼-inch-mesh hardware cloth ($15)
  • 32 cubic feet (1 1/5 cu. yd.) planting mix ($25 in bulk or $100 in bags)

 Everyone in the Ozarks knows that when you're out to garden you best get ready to do a lot of "rock" gardening, because our earth is so rough & tumble full of clay, rock and sand that it's hard to get good crops out of it unless you take years or many dollars worth of top soil, manure and compost to get it worth planting in. (Not counting tomatoes which seem to love our soil type & as does our native flora).

The above materials should be enough to create one raised bed  (see our previous blog post on how to make an insulated raised garden bed.)


With a table or power saw, cut the 4-by-4 into four 16-inch-tall corner posts. Cut two of the 2-by-6s in half. Cut the 1-inch PVC pipe into four 12-inch-long pieces and the ½-inch PVC pipes into 6-foot-long pieces. Assemble pieces on a hard, flat surface by nailing/drilling the 2-by-6's and their halves to the four corner posts you cut to make a approx. 8 ft long box. After marking off an area and placing the box where you want it to be in your garden, place the cloth (or chicken wire) on the ground to keep out moles, then fill the bed with a good healthy mix of soil (home mixes that are comprised of compost such as manure, leaves, veggie/fruit leavings are excellent- Goat, Rabbit, Horse & Donkey manure are great for this.) to where it's just about 1-1.5" from the top of the boards. You should be able to get about 6 rows of leaf lettuce out of each box, but the needs of each crop you intend to plant will vary in spacing requirements for a good healthy harvest. (Allot space for poles or supports for beans, tomatoes, etc).

Click Here For a Visual Step-By-Step on how to assemble a raised bed.

Some design ideas we found online: (good to doodle these out during Winter to help get organized for Spring!)

Remember, if you want a custom and different design your materials will change compared to what we've shown above, so allot for the changes for your own design.


Tuesday, October 30, 2012

Build a High-Protein Dispenser for FREE Chicken Food!

Found a nice little article that will help all those who have chickens, through the winter and the rest of the year saving you money by feeding natural, and high-protein, and FREE feed to your chickens with a little material found 'round the homestead or farm with a dollar or two thrown in for some minor materials.

The article I gleaned this info from is out of the "Countryside & Small Stock Journal" Vol 96 No. 6 November/December 2012, Page 61, by Jeff Hoard.

Basically the articles author explains how to create a maggot dispenser for your chickens using some simple materials:
  • Flat plywood- to put under dispenser to catch & feed chickens on a clean surface.
  • 5 gal. bucket with lid, bottom cut out but leave a 1" lip around it to hold a round piece of grate or heavy wire mesh.
  • Grate or Heavy Wire Mesh
  • Charge (dead animals, meat scraps, or raw fatty meat products. Don't use anything sick or dying.)
  • PVC Coupler
  • Long piece of ABS pipe
  • Auto Heater Vent Hose
  • Skirting-for little bird & wind barrier
  • Tools for cutting & Drilling
 The author goes on to explain how he put the dispenser together and how it works:

     "I mentioned ours being a deluxe model and I'll explain. The hanger/vent was made out of scrap pipe. At the top I inserted a long piece of ABS pipe. The horizontal hanger is another short pipe that is welded over a hole that I cut in the main vertical pipe. A little below that are two more short pieces of pipe in a v-shape that stick out on each side of the hanging bucket. These serve as bumpers. On the lid of the bucket, I inserted an appropriate sized PVC coupler and a piece of auto heater vent hose, which attaches from there up to the hanging pipe.  This is how the odor is vented up and out at the top of the long ABS pipe. Like the vent system, the "skirt" that was installed on the bucket is certainly not a necessity but does perform some added functions. first, it keeps smaller birds from hanging off the bottom trying to eat their fill. Second, the skirt serves as a wind catch. Third, as the chickens go for the maggots they hit the skirt to hopefully dislodge a few more. Fourth, it helps keep the charge from drying out (very important). I did drill one small hole in the center at the top of the bucket's lid to allow for moisture to be added onto the charge if needed. " (page 63)

The author continues with some tips, "Install the dispenser 20 ft away from the chicken house,  in the shade, this will help draw the flies away from the flock and the flies are immediately drawn to the charge. They then lay their larvae on the charge and the larvae then turn into maggots, hundreds at a time and as they grow larger they get heavier and eventually fall through the grate and onto the plywood below to be gobbled up by a waiting chicken. It usually takes about 5 days for the maggots to start dropping and as long as the charge is refreshed," there is a constant supply of high-protein feed for your chickens and it's free! Chickens can keep laying with this feed and greens for quite some time, without the need for corn scratch!

I scanned the image directly from the magazine in order to show you all what they've created and about how it'll look when finished. It's in pdf form so you will need Adobe PDF viewer to see the file>> PDF