Showing posts with label Amish. Show all posts

Tuesday, July 2, 2013

Amish Macaroni Salad

Amish Macaroni Salad 


Ingredients
2 cups uncooked elbow macaroni
3 hard-cooked eggs, chopped
1 small onion, chopped
3 stalks celery, chopped
1 small red bell pepper, seeded and chopped
2 tablespoons dill pickle relish
2 cups creamy salad dressing (e.g. Miracle Whip)
3 tablespoons prepared yellow mustard
¾ cup white sugar
2¼ teaspoons white vinegar
¼ teaspoon salt
¾ teaspoon celery seed

Directions
1. Bring a pot of lightly salted water to a boil. Add macaroni, and cook for 8 to 10 minutes, until tender. Drain, and set aside to cool. 2. In a large bowl, stir together the eggs, onion, celery, red pepper, and relish. In a small bowl, stir together the salad dressing, mustard, white sugar, vinegar, salt and celery seed. Pour over the vegetables, and stir in macaroni until well blended. Cover and chill for at least 1 hour before serving.

Thursday, March 28, 2013

Start a 1 Acre Self-Sufficient Homestead

We wanted to share this great information from Mother Earth News on how to start a 1 Acre Homestead. There are some great ideas here. 

We have the land for sale. All it needs is you! Contact us Today!


Your 1-acre homestead can be divided into land for raising livestock and a garden for raising fruits, vegetables, plus some grain and forage crops. 


Everyone will have a different approach to keeping a self-sufficient homestead, and it’s unlikely that any two 1-acre farms will follow the same plan or methods or agree completely on how to homestead. Some people like cows; other people are afraid of them. Some people like goats; other people cannot keep them out of the garden. Some people will not slaughter animals and have to sell their surplus stock off to people who will kill them; others will not sell surplus stock off at all because they know that the animals will be killed; and still others will slaughter their own animals to provide their family with healthy meat.

Read more: http://www.motherearthnews.com/modern-homesteading/self-sufficient-homestead-zm0z11zkon.aspx#ixzz2Or9G0TxS

Thursday, March 21, 2013

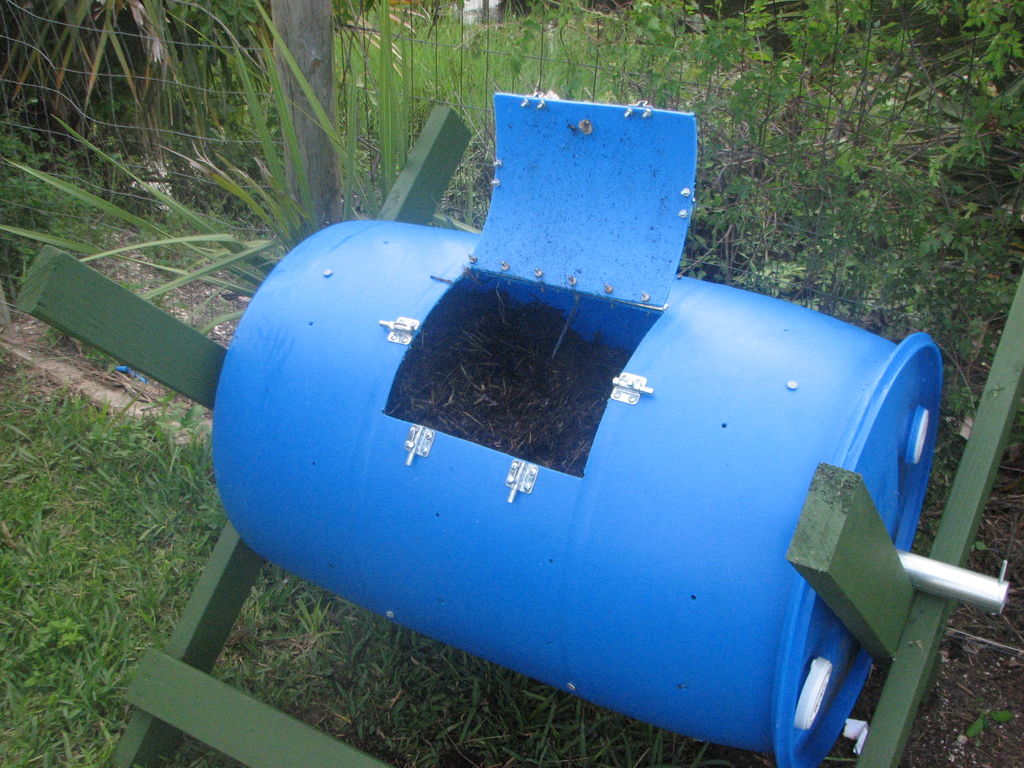
Compost Bin


Compost Bin  

by ic517

www.instructables.com

Step 1: Materials

3 2x4 x 8 pressure treated
1 galvinized chain link fence post
4 3.5inch 1/4 bolts with washers and nuts
6 or 8 6" 60d nails
one 55 gal barrel (must be food grade)
4 latches
one piano hinge
one box of 10-32 3/4" nuts and bolts ( make sure they fit your hinges and latches)
paint if you want . I use barn paint from tractor supply co . its cheap and it doesn't require primer!
now I bought most of my materials but you can use what ever you have on hand also. the whole project only cost me 50 dollars so its not that expensive any way


Step 2: Assembly

First cut 2x4s in half
take 2 2x4s measure and make a mark half way down both of them . then center them and bolt ( you can use nails but bolts work better) them together.
repeat for other side.
you should have two giant X's
it doesn't matter which way they go,so pick one side as the bottom measure up 3 inches from each foot for the bottom braces.
now attach your other 2 boards with nails or screw them together.
your frame is now done and you can start to work on the barrel.
you can cut your bottom braces a few inches longer than the barrel for a better fit but you don't have to.

Step 3: Post hole

now get a hole saw to match your post and drill in the center of each end of the barrel.drill a hole and put a bolt through the end to keep it from sliding off the frame. you'll also need to trim the post to length. 

.

Step 4: The lid

This is the most difficult part of the whole project take your time to cut , drill and line everything up.
I use 4 latches because the heat from the compost can warp the lid and the plastic is somewhat flexible anyway. the piano hinge adds stability also. start by marking the door out. I used a carpenters pencils , its a little hard to mark mark on the plastic.
then drill 4 1/4" holes in the corners.
cut out door with a jig saw . i made mine big enough for my shovel the fit in just use good judgement and dont make it to big or small.
first drill and bolt the hinge to the barrels first.
now drill and bolt the lid on . drill two holes and bolt them together first just on case they don't line up. the drill bit will try to slip on the plastic so start your drill slowly.
make a handle out of what ever , a simple finger hole would work.
now drill and attach the bolt side of the latch first then slid bolt open and use it to line up bolt reciever. close each bolt when you go to install the next one so the stay lined up. take your time aand it should be ok


Step 5: Ventilation holes

on the opposite side of barrel from the lid mark off 4 evenly spaced 1/4 holes across the barrel.then measure 6 inches down from each hole till you all gone all the way around. just make sure it has some ventilation. this would be a minimal amount . Now randomly drill some hole for the spikes . drill a hole a little small than the spike and just nail them in. these help brake up the material when you rotate the barrel speeding up the composting. You should use 4 to 8 spikes what ever works best . you can always pull them out.

Step 6: Add compost!!!!


the only other thing you could do is paint it black . they make paint that will stick to plastic. I live in south Florida so that's really not necessary but if you live in northern climates you might need to find a good sunny spot and place it there! the advantages of this barrel composer are quite a few. its quick, cheap and effective. no bugs or rats, almost no odor. you can use it in a very small yard and not bother the neighbors. 
I square foot garden ( mel is a genius ) and buying fertilizer and compost can add a lot of expense you don't need. I save a lot of money growing my own food and you would amazed how much food you can grow this way .good compost can double your harvest!


Tuesday, March 19, 2013

Rose Cuttings using a potato


Propagating roses by cuttings is easy. Some say the secret of success is the humble potato! Before planting rose cuttings, push the bottom end into a small potato, which keeps the cuttings moist as they develop roots. It sounds crazy, but apparently it works really well.

Have any of you tried this?
DIY rose cuttings - http://bit.ly/131RXH7
The Organic Rose Garden: http://amzn.to/15mYjg1
Eat Your Roses: http://amzn.to/ZHA62n


Monday, January 21, 2013

Getting the Garden ready for Spring planting without using Gas, Electricity or Oil powered machines. Off-Grid Goodness!


  While browsing online, I found a good source of tips and information that will help those off-grid or living the "simple life" to save some money and get the garden ready for Spring planting that's just a few months away.

"Once you have the grass mowed and the weeds chopped down, the next step is to break up the soil for planting. Heavy duty tools like a Broadfork can make this job easier. The 20 inch wide fork is specially sharpened to take big bites from the ground. Extra-long 60 inch handles give you lots of leverage to break the soil loose. There’s much less bending over than a hoe requires, and no need to chop or hack at the soil. Best of all, the dirt is left loose and pliable, not packed down by heavy power equipment.

Once the soil is broken up, the next step is to cultivate. Instead of using a bulky gas-powered tiller to over work your soil, you can create a smooth planting bed with an easy-to-use rotary cultivator. To use this tool, you simply push it in front of you as you walk down the rows of your garden. The wheel breaks up the soil and works in your peat moss or compost while you get some exercise.

Once your garden is cultivated, it’s time to plant. To keep your rows nice and straight, just drive a one-foot stake at the end of each row and tie a string between them. Then use the string as a guideline.

Dreading the thought of crawling around on your hands and knees to plant all those seeds? No need if you get yourself an old fashioned corn planter. All you have to do is pour the seeds into the cup on the side, push the steel blade into the ground and squeeze the handles. The seeds will drop right where you want them. It’s a very efficient system and allows you to finish a chore that could take hours in just minutes.

If you want butterflies decorating your garden, once you have the seeds in the ground, plant oregano, borage, catnip and hollyhocks between the rows. The colors and scent attract the beautiful creatures. Butterflies also like bee balm, red carnations and begonias.

After planting your garden the natural way, don’t stop there. Make a pledge to water your vegetable plants by hand every day with a good old-fashioned watering can. And instead of relying on pesticides -- which over time can work their way into the ground-water and damage the environment -- to keep the weeds down, get out there every day with a hoe and pull them up.

To keep bugs away, sprinkle a mixture of garlic power and flour on your plants. It works especially well for cabbage flies, but use it sparingly. The mix will get pasty on the leaves if applied too thickly.


( picture gained from here )


OLD TIME GARDEN TIPS
Here’s a trick to keep the woodchucks from stealing carrots from your garden. Fill glass gallon jugs with water and place them around your garden. The woodchucks see their reflections and, apparently thinking it’s another animal, run away. Sounds silly but it works.

If you’d like to force hornets, bees and wasps to move out, try hanging moth cakes on your deck, under the eaves, or anywhere else they like to build their nests. They don’t like the smell so they fly far away and call somewhere else home. "

Article taken from this site.