Showing posts with label feed. Show all posts

Wednesday, March 27, 2013

Regrow your green onions!


Did you know you can regrow your green onions?? You can cut off the roots and 

put them in water, then the roots will absorb the water and start to grow a new 

green onion. It takes a good 2-3 weeks for the green onion to grow completely 

so you can use it again, but it grows a whole new one!!!

Thursday, March 21, 2013

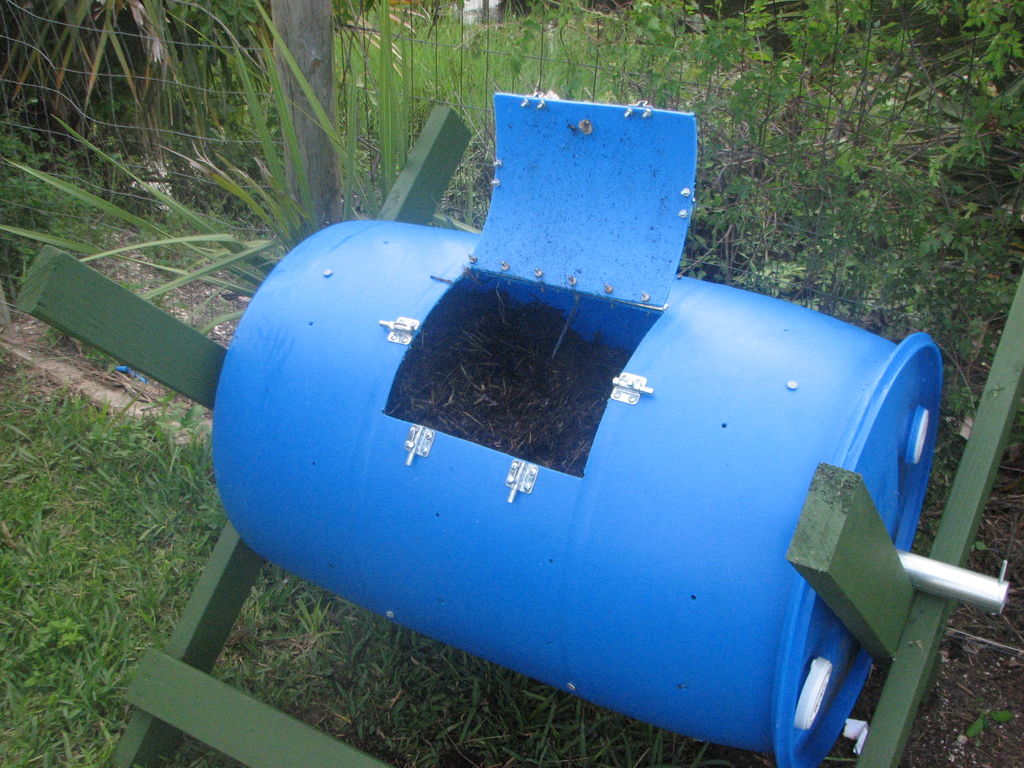
Compost Bin


Compost Bin  

by ic517

www.instructables.com

Step 1: Materials

3 2x4 x 8 pressure treated
1 galvinized chain link fence post
4 3.5inch 1/4 bolts with washers and nuts
6 or 8 6" 60d nails
one 55 gal barrel (must be food grade)
4 latches
one piano hinge
one box of 10-32 3/4" nuts and bolts ( make sure they fit your hinges and latches)
paint if you want . I use barn paint from tractor supply co . its cheap and it doesn't require primer!
now I bought most of my materials but you can use what ever you have on hand also. the whole project only cost me 50 dollars so its not that expensive any way


Step 2: Assembly

First cut 2x4s in half
take 2 2x4s measure and make a mark half way down both of them . then center them and bolt ( you can use nails but bolts work better) them together.
repeat for other side.
you should have two giant X's
it doesn't matter which way they go,so pick one side as the bottom measure up 3 inches from each foot for the bottom braces.
now attach your other 2 boards with nails or screw them together.
your frame is now done and you can start to work on the barrel.
you can cut your bottom braces a few inches longer than the barrel for a better fit but you don't have to.

Step 3: Post hole

now get a hole saw to match your post and drill in the center of each end of the barrel.drill a hole and put a bolt through the end to keep it from sliding off the frame. you'll also need to trim the post to length. 

.

Step 4: The lid

This is the most difficult part of the whole project take your time to cut , drill and line everything up.
I use 4 latches because the heat from the compost can warp the lid and the plastic is somewhat flexible anyway. the piano hinge adds stability also. start by marking the door out. I used a carpenters pencils , its a little hard to mark mark on the plastic.
then drill 4 1/4" holes in the corners.
cut out door with a jig saw . i made mine big enough for my shovel the fit in just use good judgement and dont make it to big or small.
first drill and bolt the hinge to the barrels first.
now drill and bolt the lid on . drill two holes and bolt them together first just on case they don't line up. the drill bit will try to slip on the plastic so start your drill slowly.
make a handle out of what ever , a simple finger hole would work.
now drill and attach the bolt side of the latch first then slid bolt open and use it to line up bolt reciever. close each bolt when you go to install the next one so the stay lined up. take your time aand it should be ok


Step 5: Ventilation holes

on the opposite side of barrel from the lid mark off 4 evenly spaced 1/4 holes across the barrel.then measure 6 inches down from each hole till you all gone all the way around. just make sure it has some ventilation. this would be a minimal amount . Now randomly drill some hole for the spikes . drill a hole a little small than the spike and just nail them in. these help brake up the material when you rotate the barrel speeding up the composting. You should use 4 to 8 spikes what ever works best . you can always pull them out.

Step 6: Add compost!!!!


the only other thing you could do is paint it black . they make paint that will stick to plastic. I live in south Florida so that's really not necessary but if you live in northern climates you might need to find a good sunny spot and place it there! the advantages of this barrel composer are quite a few. its quick, cheap and effective. no bugs or rats, almost no odor. you can use it in a very small yard and not bother the neighbors. 
I square foot garden ( mel is a genius ) and buying fertilizer and compost can add a lot of expense you don't need. I save a lot of money growing my own food and you would amazed how much food you can grow this way .good compost can double your harvest!


Tuesday, October 30, 2012

Build a High-Protein Dispenser for FREE Chicken Food!

Found a nice little article that will help all those who have chickens, through the winter and the rest of the year saving you money by feeding natural, and high-protein, and FREE feed to your chickens with a little material found 'round the homestead or farm with a dollar or two thrown in for some minor materials.

The article I gleaned this info from is out of the "Countryside & Small Stock Journal" Vol 96 No. 6 November/December 2012, Page 61, by Jeff Hoard.

Basically the articles author explains how to create a maggot dispenser for your chickens using some simple materials:
  • Flat plywood- to put under dispenser to catch & feed chickens on a clean surface.
  • 5 gal. bucket with lid, bottom cut out but leave a 1" lip around it to hold a round piece of grate or heavy wire mesh.
  • Grate or Heavy Wire Mesh
  • Charge (dead animals, meat scraps, or raw fatty meat products. Don't use anything sick or dying.)
  • PVC Coupler
  • Long piece of ABS pipe
  • Auto Heater Vent Hose
  • Skirting-for little bird & wind barrier
  • Tools for cutting & Drilling
 The author goes on to explain how he put the dispenser together and how it works:

     "I mentioned ours being a deluxe model and I'll explain. The hanger/vent was made out of scrap pipe. At the top I inserted a long piece of ABS pipe. The horizontal hanger is another short pipe that is welded over a hole that I cut in the main vertical pipe. A little below that are two more short pieces of pipe in a v-shape that stick out on each side of the hanging bucket. These serve as bumpers. On the lid of the bucket, I inserted an appropriate sized PVC coupler and a piece of auto heater vent hose, which attaches from there up to the hanging pipe.  This is how the odor is vented up and out at the top of the long ABS pipe. Like the vent system, the "skirt" that was installed on the bucket is certainly not a necessity but does perform some added functions. first, it keeps smaller birds from hanging off the bottom trying to eat their fill. Second, the skirt serves as a wind catch. Third, as the chickens go for the maggots they hit the skirt to hopefully dislodge a few more. Fourth, it helps keep the charge from drying out (very important). I did drill one small hole in the center at the top of the bucket's lid to allow for moisture to be added onto the charge if needed. " (page 63)

The author continues with some tips, "Install the dispenser 20 ft away from the chicken house,  in the shade, this will help draw the flies away from the flock and the flies are immediately drawn to the charge. They then lay their larvae on the charge and the larvae then turn into maggots, hundreds at a time and as they grow larger they get heavier and eventually fall through the grate and onto the plywood below to be gobbled up by a waiting chicken. It usually takes about 5 days for the maggots to start dropping and as long as the charge is refreshed," there is a constant supply of high-protein feed for your chickens and it's free! Chickens can keep laying with this feed and greens for quite some time, without the need for corn scratch!

I scanned the image directly from the magazine in order to show you all what they've created and about how it'll look when finished. It's in pdf form so you will need Adobe PDF viewer to see the file>> PDF