Showing posts with label wood working projects. Show all posts

Thursday, June 6, 2013

DIY - Outdoor Shower

This outdoor shower is one of the ways you can conserve energy. The sun heats the water in the black-painted tank on top for a shower each day. After showering,  refill the tank with the garden hose and the sun heats the water for the next day’s shower.

 Spend about $140 on the project. This tank is an old water heater that is stripped down and painted flat black. There is an overflow vent on top to let you know when it is full, and also to prevent airlock. Also, is added a shut-off valve just before the shower head.

The base is a recycled shower base. The walls and door are two pieces of privacy fencing that is cut down to fit. The floor is made from treated lumber.


Caution: Be sure to build the platform for the water tank stout enough to hold the tank full of water. A full 50-gallon tank weighs about 400 pounds. Check the water before getting in to be sure it’s not too hot


Tuesday, March 26, 2013

Cooking On A Log


Cooking on a log...


Cut the log evenly on both sides so it stands up freely. Then cut it into vertical segments most of the way down the length of the log. Stuff in some newspaper into the cracks as deep as you can get it, leaving a wick at the bottom, and light it up.
That's all there is to it—the log burns from the inside out, and you have a simple, handmade stove.


Thursday, March 21, 2013

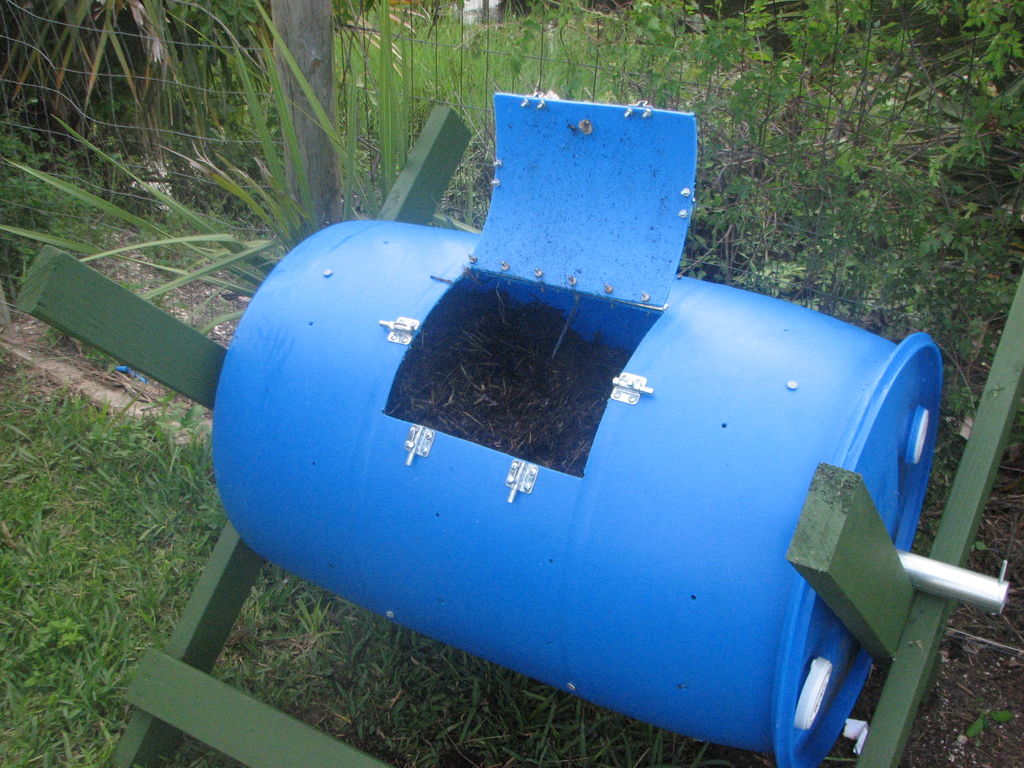
Compost Bin


Compost Bin  

by ic517

www.instructables.com

Step 1: Materials

3 2x4 x 8 pressure treated
1 galvinized chain link fence post
4 3.5inch 1/4 bolts with washers and nuts
6 or 8 6" 60d nails
one 55 gal barrel (must be food grade)
4 latches
one piano hinge
one box of 10-32 3/4" nuts and bolts ( make sure they fit your hinges and latches)
paint if you want . I use barn paint from tractor supply co . its cheap and it doesn't require primer!
now I bought most of my materials but you can use what ever you have on hand also. the whole project only cost me 50 dollars so its not that expensive any way


Step 2: Assembly

First cut 2x4s in half
take 2 2x4s measure and make a mark half way down both of them . then center them and bolt ( you can use nails but bolts work better) them together.
repeat for other side.
you should have two giant X's
it doesn't matter which way they go,so pick one side as the bottom measure up 3 inches from each foot for the bottom braces.
now attach your other 2 boards with nails or screw them together.
your frame is now done and you can start to work on the barrel.
you can cut your bottom braces a few inches longer than the barrel for a better fit but you don't have to.

Step 3: Post hole

now get a hole saw to match your post and drill in the center of each end of the barrel.drill a hole and put a bolt through the end to keep it from sliding off the frame. you'll also need to trim the post to length. 

.

Step 4: The lid

This is the most difficult part of the whole project take your time to cut , drill and line everything up.
I use 4 latches because the heat from the compost can warp the lid and the plastic is somewhat flexible anyway. the piano hinge adds stability also. start by marking the door out. I used a carpenters pencils , its a little hard to mark mark on the plastic.
then drill 4 1/4" holes in the corners.
cut out door with a jig saw . i made mine big enough for my shovel the fit in just use good judgement and dont make it to big or small.
first drill and bolt the hinge to the barrels first.
now drill and bolt the lid on . drill two holes and bolt them together first just on case they don't line up. the drill bit will try to slip on the plastic so start your drill slowly.
make a handle out of what ever , a simple finger hole would work.
now drill and attach the bolt side of the latch first then slid bolt open and use it to line up bolt reciever. close each bolt when you go to install the next one so the stay lined up. take your time aand it should be ok


Step 5: Ventilation holes

on the opposite side of barrel from the lid mark off 4 evenly spaced 1/4 holes across the barrel.then measure 6 inches down from each hole till you all gone all the way around. just make sure it has some ventilation. this would be a minimal amount . Now randomly drill some hole for the spikes . drill a hole a little small than the spike and just nail them in. these help brake up the material when you rotate the barrel speeding up the composting. You should use 4 to 8 spikes what ever works best . you can always pull them out.

Step 6: Add compost!!!!


the only other thing you could do is paint it black . they make paint that will stick to plastic. I live in south Florida so that's really not necessary but if you live in northern climates you might need to find a good sunny spot and place it there! the advantages of this barrel composer are quite a few. its quick, cheap and effective. no bugs or rats, almost no odor. you can use it in a very small yard and not bother the neighbors. 
I square foot garden ( mel is a genius ) and buying fertilizer and compost can add a lot of expense you don't need. I save a lot of money growing my own food and you would amazed how much food you can grow this way .good compost can double your harvest!


Friday, February 1, 2013

DIY Pergola by Popular Mechanics


Pergola's won't keep you from the wind, rain or harsh Summer sun, but they are a beautiful addition to gardens, yards, parks and the back yard for that little extra pizzazz you're wanting. Even more so when climbing vines are planted around the pergola that make a beautiful accent to the structure (or add some accenting weather sturdy fabric to block the wind or sun).

Popular Mechanics had a wonderful article on how to build your own pergola, step by step with pictures: (directly from the Popular Mechanics website)

How to Build a Backyard Pergola: Simple DIY Woodworking Project

Step-by step plans to make an arbor-like cedar structure, with 3D animation and master-level blueprints

By Rick Peters
July 14, 2006 12:00 AM


Here's a structure that won't provide shelter from wind or rain, and is only marginally better when it comes to the midday sun. So, why build it? Because in the absence of walls and a roof, it defines an outdoor space without constraining it. It's a unique architectural blend that places you both inside and out at the same time. The structure is called a pergola, and it's just the thing to bring backyard landscaping to life. Pergolas were common features of Italian Renaissance gardens, often covering walkways or serving as grape arbors. Today, the same design can be used to define a passageway or frame a focal point in your yard. Add a climbing plant such as wisteria or, yes, grapevines, and your pergola will provide color and shade as well.

Our pergola fits on an 8-ft. square, but it's easy to modify it to suit your site. Cedar is our material of choice because it resists decay. Leave it unfinished and let it gradually turn gray. Or, apply a stain or sealer designed for exterior use.


Model designed in Alibre Design Xpress. Get your FREE copy today!

Download a larger animated PDF of this project with a printable step-by-step guide (Requires Adobe Reader).

Installing the Posts
The posts are composed of pressure-treated 4 x 4 cores that are sheathed with 1 x cedar. We secured the post cores to a concrete pad with steel post-base anchors. If you're not building on a pad, use longer posts and set them in the earth below the frost line.

Lay out the post positions and mark the screw locations [1].


We used 1/4-in. Tapcon screws that thread into 3/16-in. holes bored with a hammer drill [2].


Hold each post plumb and drive nails through the anchors into the wood [3]. If necessary, brace the posts so they stay plumb.


Attaching the Support Beams
Cut the four 2 x 6 cedar support beams to length, use a template to mark the curved notches at the ends and cut the notches with a jigsaw. Clamp the beams in place, and check that they're level and that the posts are plumb.

Then secure each end with four 3-in. No. 10 screws [4].


When adding the second of each pair of beams, check that they're level across the top edges [5].


Adding the Crossbeams
The 2 x 6 crossbeams are notched to fit over the support beams.

Cut the notches with a dado blade in the table saw [6], or lay out each notch and use a jigsaw to remove the waste.


Then, make the curved end cuts [7].


Install the crossbeam pairs at the posts first. When they're in place, bore screwholes down through their top edges and screw crossbeams to the support beams [8]. Then add the three remaining pairs with similar spacing.


Post Trim and Braces
Cut the post trimpieces to length and width. Note that you'll need to notch some of the pieces to fit between the support beams, or you can make filler blocks to cover the post cores at these areas. Instead of trying for perfectly flush corners, we dimensioned the trim to leave a 1/8-in. shadow line, or reveal.

Secure the trimpieces to the posts with construction adhesive and galvanized finishing nails [9].


Use 2 x 6 stock for the diagonal braces. Cut the ends to length at 45 degrees, and use a flexible stick to lay out the shallow curve on the lower edge of each brace. Fasten the braces to the posts and beams with screws [10].


Fitting the Top Slats
Cut the five 2 x 4 slats to length and shape the ends.

Clamp each slat in place and mark the crossbeam notch positions [11].


If you use a table saw and dado blade to make the cuts, be sure to support the long stock at the opposite end [12].


Then, bore pilot holes and attach the slats with 3-in. No. 10 screws [13].


Capping the Posts
To make the post caps, cut square blanks and then set the table saw blade to 15 degrees for shaping the bevels.

Use a longer board with a stop across the end as a sled to guide each blank through the blade [14]. Clamp the blanks to the sled when making the cuts.


Secure the caps with 6d galvanized finishing nails and construction adhesive [15].


Read more: How to Build a Pergola - DIY Building a Pergola - Popular Mechanics