
Showing posts with label garden beds. Show all posts
Showing posts with label garden beds. Show all posts
Monday, July 15, 2013

Sunday, July 14, 2013
10 Uses For Wood Ash

Before you dispose of those wood ashes sitting in your fireplace or your wood burning stove, try using your wood ash these 10 different ways:
1. Use wood ash to add nutrients to your compost. Contains potash and calcium carbonate.
2. Use wood ash to deter snails from plants. Spread around the perimeter of the plant.
3. Use wood ash to add nutrients to planting holes for tomatoes by adding about half a cup to each hole.
4. Use wood ash to clean stove glass doors. Add to a damp sponge to wipe away sooty deposits.
5. Use wood ash for soap making. Soak ashes in water to make lye which is used in the soap making process.
6. Use wood ash to clean metal by making a paste with the ash.
7. Use wood ash as a dust bath for chickens, it kills lice and mites.
8. Use wood ash to remove sticky labels from glass jars by making a paste with a little water.
9. Use wood ash as a top dressing around onions, leeks and garlic.
10. Use wood ash to raise the Ph of soil if required, as an alternative to lime.
These 10 uses for wood ash was originally published on The Cyprus Garden Blog
Wednesday, July 10, 2013
Tip for Rose Bushes

Quick tip:
Flatten a banana peel and bury it under one inch of soil at the base of a rosebush. The peel’s potassium feeds the plant and helps it resist disease. Consider it a nutritional boost for you and your buds.
Thursday, June 27, 2013
Fish Pond Accessory - Neat idea!
This is AWESOME! The instructions said, "use a gal jar and a type of stand place the jar in
the water on it's side, let it fill with water (completely submerged) then tip it up slowly
bottom up, and place the jar mouth into the stand, making sure to keep the mouth under
water. The fish can swim up into the jar as they wish.

Wednesday, June 26, 2013
Glow In The Dark Pots For Planting
Buy a flower pot that you really like and use Rustoleum's Glow-in-the-dark paint to paint the pot. During the day, the paint will absorb the sunlight and at night the pots will glow.

Tuesday, June 18, 2013
Growing Potatoes In Containers
Potatoes can easily be cultivated in containers simply as easy as in a classic technique of growing plants. half barrels, Terracotta pots, trash cans and also a burlap sack,or trash bags are all excellent options of containers to raise your potatoes in. The one factor that you require to keep in mind when developing potatoes in a container, is that the vase of your option could not really be to deep, 12 - 18 inches is a great depth. The cause for this depth is that sun energy is essential for vegetable progress, plus even though potato plants could expand to a level in the place of 2 - 3 feet, they require to be hilled or protected as they grow.
Growing your plants in a bag enables you to pull the sides up as the vegetable grows, in a container or other sort of pot you will always have to hill the plant as it gets taller. That can easily done just by placing a 2 foot tall wire mess close to the inside of the pot as the plat develops and covering the plant with hay, potting media, or compost. When you have you have the pot of your option, make sure there are enough drainage gaps in the bottom or the lower sides.
At this point is it the moment to get ready your potatoes for seeding. These potatoes may be seed potatoes from a garden company, or potatoes that you possess on hand that are beginning to develop. Cut the potatoes so that there are three eyes on each piece, two eyes is good if the numbers is not going to work out. I have even grown all of them with one, and they did just good. As soon as the cutting is finished, you will require them to stay for around a day to create a dry covering around the cut area.
When you are looking for the potatoes to dry, you might begin filling your pot using potting media combined with an healthy fertilizer, and pre soak the media so that it is moist. Once ready, put the potatoes that you have cut in the pot with the eyes facing up. In the regular container,with a size around twenty inches, I put three items spaced apart evenly, protect them with about 2 - 3 inches of media, plus water until the media is moist. To avoid wasting time, you could pre soak the media before you plant, and get it available for covering the potatoes at planting time.
Caring for your potato plants is pretty easy. Put them in a place that obtains a minimum 6 hours of direct sun and is not opened to winds. Examine the moisture content of the media, and water everyday if necessary. Pots dry faster that soil in a classic garden, so they might require watering each day.
When the plants obtain to a height of about 6 inches, you will have to hill the potato plant by masking the plants using more potting media, giving about 2/3 of the plant exposed. Keep on hilling till the plant halts from increasing, or begins to blossom.
Reaping your own potatoes can begin any moment after the plant blossoms, youthful potatoes are tiny, but tender. If you decide not to picking them early, simply wait till the plants begin to change yellow and gently spill the media out of the container to gather your new crop of potatoes.barrels, Terracotta pots, trash cans and also a burlap sack,or trash bags are all excellent options of containers to raise your potatoes in.

Monday, June 17, 2013
DIY Tip to keep critters out of your garden
If you finely chop citrus rinds and sprinkle them on the mulch in your garden, they keep neighborhood cats, dogs and other critters away from your veggies. Animals don't like the smell of the orange oil.

Friday, April 19, 2013
DIY - How to: Keep Birds Out of Your Strawberries

Paint a bunch of small stones and place them in and around the strawberry plants. The birds will dive for them and learn they are NOT nice and juicy. By the time the berries are ripe the birds will not bother the real fruits.

Collect some strawberry shaped stones. Wash well with soap and water and let dry overnight.
When it's time to paint, I like to work on about a dozen at a time so that the paint on the first one is dry by the time I'm finished that particular step on the 12th. one. I use acrylics.

Step 1 of painting:
To achieve a bright red result, undercoat stone with white.Paint half your stone at a time,let dry, turn over and paint other half.One coat of white is sufficient. The white undercoat makes the red "pop out".

Basecoat with any red of your choice, letting the first side dry before continuing to the other side. You will probably need two coats of red.
In these examples I used Delta Ceramcoat Fire Red.
In these examples I used Delta Ceramcoat Fire Red.

Look at your "berry" and decide which end would be best suited for the hull. One end is usually less pointed and that is where the hull would go. With Hauser Medium Green, or any medium green of your choice, base in the hull, making 6 or 7 pointed leaves that come about 1/4 to 1/3 of the way down the strawberry. Try not to make your hull so small that you can't see it from a side view.

With Hauser Dark Green, or any dark green, outline each hull leaf, put in a central vein on each, and add a circle at the top center.

With Hauser Light Green, or any light green, randomly add highlights here and there. No need to wash out your brush between greens..mixing them is more interesting.

With Black, using a liner brush,randomly add the little pockets where the seeds grow.
Avoid the temptation to add too many.
Also, keep them small so they don't end up looking like watermelon seeds.
Avoid the temptation to add too many.
Also, keep them small so they don't end up looking like watermelon seeds.

Again, using a liner brush, place a dot of off white in each little pocket to represent the seed. I used Ceramcoat Light Ivory.

The final step is to give your berry 2 or 3 coats of varnish..either in spray form or with a wipe-on product called Final Coat. The varnish protects the paint from chipping,gives depth to the colour,and it keeps the paint from sticking and lifting when you pile the berries in a basket.
Thursday, April 11, 2013
DIY Water Hose Storage / Cleaning Station

This is just the neatest idea & is so handy for the garden! Your diy wash station that is so simple & get's the water hose of the ground. Make it your own. This example shows a galvanized pail screwed to a 2 x 4 that is in the ground with a bird house on the top. Roll the hose around the pail & inside a place to store brushes, small garden tools, and a great place to hang a towel! I just love it & is gonna be a summer project for me!
Wednesday, April 3, 2013
The Benefits of Vertical Gardening
What Is Vertical Gardening?
Simply put, vertical gardening is the practice of growing certain vegetable plants up a support to keep them from spreading on the ground. Most vining plants, such as cucumbers, can be grown vertically using a trellis. Growing these plants vertically saves space, and generally promotes more vigorous growth.

The Benefits of Vertical Gardening
As mentioned above, growing plants vertically saves space in the vegetable garden. You can grow more plants in a smaller area by using vertical gardening practices. A plant that would normally take up 4 square feet spread across the vegetable garden, will only take up 2 square feet if vertical gardening is used.
Vertical gardening can also greatly improve your crop production. Keeping vegetable plants off the soil will help prevent soil-borne diseases, and may limit the chances of rotten fruit. If vegetables are allowed to lay on the soil, they can begin rotting on the bottom side due to excessive moisture.
Growing some vining plants up a support also reduces the risk of powdery mildew, and other mildews, by improving the air circulation around the plants. This will also improve access to blooms for bees and other pollinators. Vertical gardening can greatly improve the overall appearance of your garden, because spreading plants will not look so unwieldy.
Tuesday, April 2, 2013
Tips to use recycled plastic jugs in your garden
Here are are few tips to use recycled plastic jugs in your garden!
ENJOY!
1. Use gallon bottles/jugs and cultivate what you want.. ideal for anyone who lives in an apartment or small area.

2. Cut the bottom off your gallon milk jugs (and save the bottoms ... you'll see why!) and use them as cloches in the garden! Place them over young tomato, pepper, and other plants, to protect them from frost on chilly spring nights.

3. Slice off the bottom inch or two of your milk jugs, and use them as a tray for starting seeds. Use the top sections as cloches, and you've gotten two great uses out of every milk jug! Poke a few holes in the bottom for drainage, add potting soil or seed starting mix, and plant seeds.

4. Don't spend a bushel of cash on upside-down vegetable planters. You can make them from milk jugs.

5. Slice milk jugs at an angle and you have an instant scoop, complete with handle. Just make sure you leave the lid on! This works perfectly for grass seed, fertilizer, potting soil, and even bird seed! For smaller jobs, use half-gallon jugs.

6. For liquid fertilizer, plant food, herbicides, or other chemicals that need mixing with water, use a milk jug! Measure and add the first ingredient to an empty milk jug, set it on a level surface, and use a permanent marker to make a line at the top of the liquid. Write the ingredient name in the space it occupies in the jug. Add other ingredients as needed, one at a time, marking and labeling after each addition. Next time you make the mix, you won't have to measure. Just use the markings on the milk jug! To avoid mixing chemicals that shouldn't be mixed, reserve one milk jug for your plant food, another for herbicides, and so on, and label them clearly.

7. Punch a series of small holes in the top of a gallon or half-gallon milk jug, fill with water, and use in place of a watering can! The half-gallon size works great for children or anyone who can't manage a heavy full gallon. The water comes out slowly, so kids are less likely to drown plants. If you have to transport water to a garden or flower bed, use a solid lid to haul the gallons of water, and replace it with a hole-punched lid once you get there!

8. Gallon milk jugs are big enough to plant tomatoes. Can hang on deck or wall.

9. Poke tiny holes in the bottom of the jug and place next to new plants.

Friday, March 29, 2013
How To Make A Hanging Gutter Garden

Materials
1 – 8′ PVC white rain gutter cut into 3 32″ sections
6 – PVC white gutter end caps
2 – 1/8″diameter steel cables cut to desired length
6 – Feeney Cross Clamps (see image below)
6 – 1/8″ diameter Feeney steel rods
2 – Galvanized eye hooks
Potting soil and Plants
Tools
Cordless Drill with drill bit set
Hand saw or hack saw
T-square or straight edge
Tape measure
Permanent marker
Level
Eye protection


1. Determine the center of your gutters and draw a reference line (otherwise your gutter won’t hang right).
2. Mark and drill the holes for the steel cable rods. Find a drill bit the same diameter as the cable to minimize the wiggle room.
3. Space drill holes a few sizes larger to make sure you get good drainage (plant roots hate sitting in water for long periods of time).
2. Mark and drill the holes for the steel cable rods. Find a drill bit the same diameter as the cable to minimize the wiggle room.
3. Space drill holes a few sizes larger to make sure you get good drainage (plant roots hate sitting in water for long periods of time).


1. Locate a spot that gets at least 4 hours of sun.
2. Drill pilot holes (a hole slightly smaller in diameter than the screw diameter) to make screwing in the eye hook a lot easier. Make sure the holes are the same distance as the steel cable so they hang straight down.
3. Slide the gutters through the holes and secure them with the cross clamps at your desired heights.
4. Secure the gutter with the cross clamps and half circle steel rods.


Now you’re ready to fill it with organic potting soil and plant them with your choice of shallow rooted plants.
Special thanks to Goods Home Design.
http://goodshomedesign.com/hanging-gutter-gardenhow-hanging-gutter-garden/
Wednesday, March 27, 2013
Regrow your green onions!

Did you know you can regrow your green onions?? You can cut off the roots and
put them in water, then the roots will absorb the water and start to grow a new
green onion. It takes a good 2-3 weeks for the green onion to grow completely
so you can use it again, but it grows a whole new one!!!
Thursday, March 21, 2013
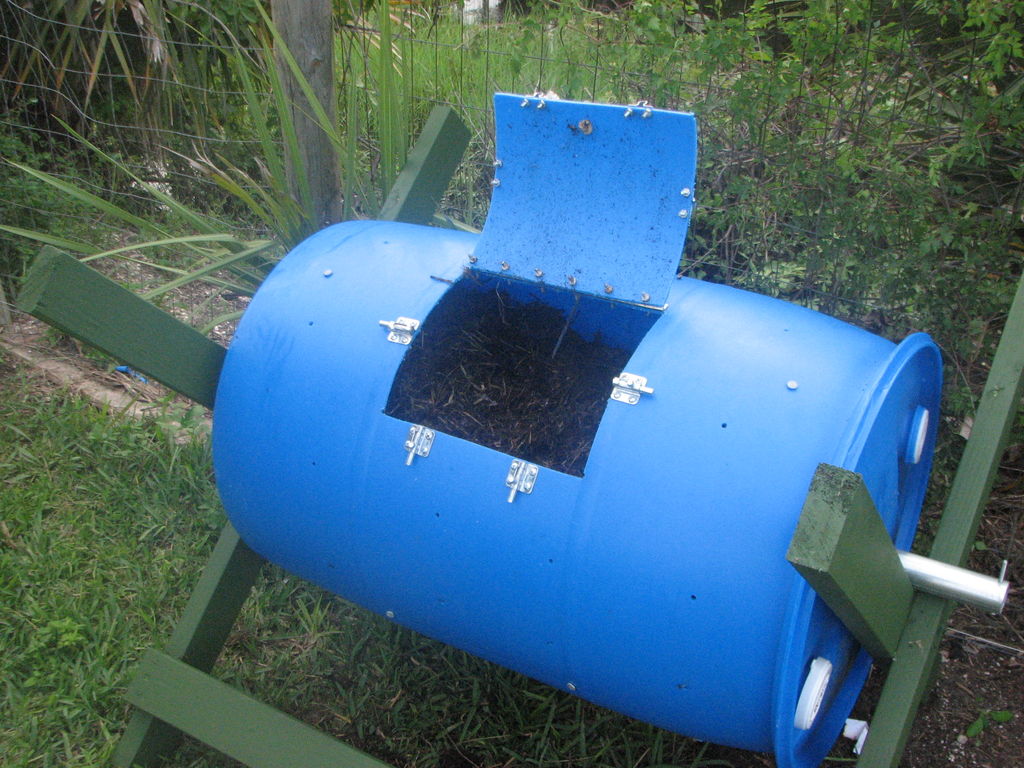
Compost Bin
Compost Bin
by ic517
www.instructables.com
Step 1: Materials
3 2x4 x 8 pressure treated
1 galvinized chain link fence post
4 3.5inch 1/4 bolts with washers and nuts
6 or 8 6" 60d nails
one 55 gal barrel (must be food grade)
4 latches
one piano hinge
one box of 10-32 3/4" nuts and bolts ( make sure they fit your hinges and latches)
paint if you want . I use barn paint from tractor supply co . its cheap and it doesn't require primer!
now I bought most of my materials but you can use what ever you have on hand also. the whole project only cost me 50 dollars so its not that expensive any way

Step 2: Assembly
First cut 2x4s in half
take 2 2x4s measure and make a mark half way down both of them . then center them and bolt ( you can use nails but bolts work better) them together.
repeat for other side.
you should have two giant X's
it doesn't matter which way they go,so pick one side as the bottom measure up 3 inches from each foot for the bottom braces.
now attach your other 2 boards with nails or screw them together.
your frame is now done and you can start to work on the barrel.
you can cut your bottom braces a few inches longer than the barrel for a better fit but you don't have to.

Step 3: Post hole
now get a hole saw to match your post and drill in the center of each end of the barrel.drill a hole and put a bolt through the end to keep it from sliding off the frame. you'll also need to trim the post to length.
.
Step 4: The lid
This is the most difficult part of the whole project take your time to cut , drill and line everything up.
I use 4 latches because the heat from the compost can warp the lid and the plastic is somewhat flexible anyway. the piano hinge adds stability also. start by marking the door out. I used a carpenters pencils , its a little hard to mark mark on the plastic.
then drill 4 1/4" holes in the corners.
cut out door with a jig saw . i made mine big enough for my shovel the fit in just use good judgement and dont make it to big or small.
first drill and bolt the hinge to the barrels first.
now drill and bolt the lid on . drill two holes and bolt them together first just on case they don't line up. the drill bit will try to slip on the plastic so start your drill slowly.
make a handle out of what ever , a simple finger hole would work.
now drill and attach the bolt side of the latch first then slid bolt open and use it to line up bolt reciever. close each bolt when you go to install the next one so the stay lined up. take your time aand it should be ok

Step 5: Ventilation holes
on the opposite side of barrel from the lid mark off 4 evenly spaced 1/4 holes across the barrel.then measure 6 inches down from each hole till you all gone all the way around. just make sure it has some ventilation. this would be a minimal amount . Now randomly drill some hole for the spikes . drill a hole a little small than the spike and just nail them in. these help brake up the material when you rotate the barrel speeding up the composting. You should use 4 to 8 spikes what ever works best . you can always pull them out.
Step 6: Add compost!!!!
the only other thing you could do is paint it black . they make paint that will stick to plastic. I live in south Florida so that's really not necessary but if you live in northern climates you might need to find a good sunny spot and place it there! the advantages of this barrel composer are quite a few. its quick, cheap and effective. no bugs or rats, almost no odor. you can use it in a very small yard and not bother the neighbors.
I square foot garden ( mel is a genius ) and buying fertilizer and compost can add a lot of expense you don't need. I save a lot of money growing my own food and you would amazed how much food you can grow this way .good compost can double your harvest!
I square foot garden ( mel is a genius ) and buying fertilizer and compost can add a lot of expense you don't need. I save a lot of money growing my own food and you would amazed how much food you can grow this way .good compost can double your harvest!
Friday, January 25, 2013
Ozarks Gardening Made Easy with Raised Beds! (How-To)
Materials for a raised garden bed
- One 6-foot-long 4-by-4 ($15) (Cedar or Redwood is best for rot resistance & Aesthetics)
- Six 8-foot-long 2-by-6s ($75) (Cedar or Redwood is best for rot resistance & Aesthetics)
- 32 3½-inch #14 wood screws and 16 ½-inch #8 wood screws ($29)
- One 4- by 10-foot roll of ¼-inch-mesh hardware cloth ($15)
- 32 cubic feet (1 1/5 cu. yd.) planting mix ($25 in bulk or $100 in bags)
Everyone in the Ozarks knows that when you're out to garden you best get ready to do a lot of "rock" gardening, because our earth is so rough & tumble full of clay, rock and sand that it's hard to get good crops out of it unless you take years or many dollars worth of top soil, manure and compost to get it worth planting in. (Not counting tomatoes which seem to love our soil type & as does our native flora).
The above materials should be enough to create one raised bed (see our previous blog post on how to make an insulated raised garden bed.)

With a table or power saw, cut the 4-by-4 into four 16-inch-tall corner posts. Cut two of the 2-by-6s in half. Cut the 1-inch PVC pipe into four 12-inch-long pieces and the ½-inch PVC pipes into 6-foot-long pieces. Assemble pieces on a hard, flat surface by nailing/drilling the 2-by-6's and their halves to the four corner posts you cut to make a approx. 8 ft long box. After marking off an area and placing the box where you want it to be in your garden, place the cloth (or chicken wire) on the ground to keep out moles, then fill the bed with a good healthy mix of soil (home mixes that are comprised of compost such as manure, leaves, veggie/fruit leavings are excellent- Goat, Rabbit, Horse & Donkey manure are great for this.) to where it's just about 1-1.5" from the top of the boards. You should be able to get about 6 rows of leaf lettuce out of each box, but the needs of each crop you intend to plant will vary in spacing requirements for a good healthy harvest. (Allot space for poles or supports for beans, tomatoes, etc).
Click Here For a Visual Step-By-Step on how to assemble a raised bed.
Some design ideas we found online: (good to doodle these out during Winter to help get organized for Spring!)
Remember, if you want a custom and different design your materials will change compared to what we've shown above, so allot for the changes for your own design.


Subscribe to:
Posts (Atom)