Showing posts with label Winter Storage. Show all posts

Thursday, June 20, 2013

DIY - Key Organizer

Most people have to keep track of at least a few keys. The easiest way to do that is to just keep them all on one key ring. But the more keys that you have, the more they fan out on the ring. If you have a lot of keys, then your key ring can get pretty bulky and impractical to carry in your pocket. Here is an alternate design for holding and organizing your keys that is a little more efficient.

The design of this key holder is very similar in construction to a Swiss Army Knife. The keys are arranged on two parallel bars. Each key can be rotated into the handle for compact storage and rotated back out for use. So here is how to make a Swiss Army Key Ring.


Materials:
Two pieces of wood (about 1" x 3.75" x 1/8" each)
Thin sheet metal (about 2" x 3.75")
Two #8 machine screw lock nuts
Two #8 machine screws, 3/4" long
Ten #8 machine screw washers
Glue that is able to bond wood to metal (not pictured)
Wood stain (optional)
Polyurethane (optional)

Tools:
Drill and bit set
Tin snips
Sand paper/sanding block
Small binder clamps
Pencil
Ruler

Source Tips:
Paint stir sticks are a good size to be used for the wood pieces. These are generally free at the paint section of most hardware stores. For the sheet metal, I used a baking sheet that I found at dollar tree for $1. This yields about 13" x 9" of metal.

Tuesday, April 16, 2013

Monday, March 25, 2013

Homemade dishwasher detergent cubes with just four ingredients


Homemade dishwasher detergent cubes with just four ingredients! 
1 Cup Borax, 1 Cup Washing Soda, 1/4 Cup Epsom Salt, Lemon Juice. 


Ingredients:
1 Cup Borax
1 Cup Washing Soda
1/4 Cup Epsom Salt
Lemon Juice


First, start by mixing all the powders together. Make sure they get mixed up good because you want it evenly spread through all the cubes you're going to be making. If you're not sure about the Borax, just eliminate that from the recipe, it won't harm it at all.

When everything was mixed,  put a cup of the powder into a separate bowl and then pour in a little bit of lemon juice. For one cup of powder used 4 tablespoons of lemon juice. You don't want it to be dry but you don't want it soaking wet either. 4 tablespoons made it a little wet and sticky which is exactly what you want.

The lemon juice will foam when it hits the powder. Mix it all in and get it a little sticky. When finished with that, start to add it to the ice cube trays. Put in the amount and pat it down.

Now, when you're all done, set the cubes up on the window sill in the kitchen so that it would get a lot of sun and therefore dry quicker. Letting it sit overnight will make it nice and hard. In the morning flip the trays over and knock the cubs out.


Tuesday, October 2, 2012

How to Salvage Junk and use it for your Garden as a Root Cellar or Veggie Storage!

You might be thinking, "I don't want junk in my garden, why would I salvage junk?!" 

      Well, let me explain, instead of going to the expense of putting in a cellar yourself, whether through paying for physical labor, the cost of cement, etc you can simply bury a large freezer that no longer works and putting straw, raked up leaves or other insulation material on top of tarp that covers the top of the freezer door, this helps keep out critters and keep your stored food insulated in the winter months, or perhaps you need something larger and assuming you have the space for it, ever consider making use of that old, broke-down school bus lying in the local junk yard by burying it up to the rear access doors? Voila, instant Root Cellar! What about that old galvanized trash can out back that's just taking up space, bury that and you have a great little covey for your root veggies, all you need is straw for insulation and it's already rodent-proof!

That get your attention?

 Good!

 Now let me delve further into the method to this madness.


 First off, be mindful of where you stash your garden treasure troves, preferably on the Northern side of your land or home and remember keep safety in mind, disable latches so kids or elderly don't get trapped in by accident.

Bury A School Bus!
http://4.bp.blogspot.com/-1jvcpEFQghE/T4bv1167SvI/AAAAAAAAELI/BHusD_GtZPs/s1600/root-cellar3.jpg


Consider burying a junked school bus, yes you will need to dig a proper sized hole and make sure that the bus is water tight (sealant or wrapping will be needed) and you will also have to allow for access to the rear doors and be sure to board up the windows and seal them for effective insulation. Also, you will need at least two PVC pipe vents for air flow as with any root cellar.

Bury Garbage Cans:


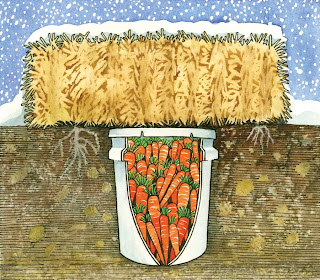
(Image from Mother Earth News )

    You can also use Garbage cans that are sealed or galvanized for smaller storage areas or land allotments, you simply need a can (cut the bottom out or poke holes for drainage), straw and a bit of dirt for the inside in order to place your winter squash and root veggies in, the straw will be used to cover the top of the lid of the trash can in order to insulate it- of course you will need to dig a hole big enough to stick your can into.

To access your veggies, simply remove the tarp (opt), straw bale, and lift off the lid (if you want an additional security from rodents and moisture, put black tarp down over the straw bale on top of the lid and make sure there are drainage ditches on either side of the can and secure the tarp with cement blocks or heavy rocks) and then snatch however many veggies you need for supper and replace your insulation!

Remember to layer leaves or straw between the veggies!


Figure 4. A well box that supports an access hatch above ground level
Here is a good article from Back Woods Home Magazine that shows you how to build a small cold storage bin.

 Bury a Freezer or Refrigerator:
 

Stuff You’ll Need:
Straw Bales
Clear Plastic Sheeting
Plastic Sheeting
Shovel and Pick
Old Deep-freeze Or Refrigerator

Step 1:
Remove motor, shelves and lock from door (so no child can get locked inside).
Step 2:
Dig a hole large enough to hold the deep freeze where the top of the freezer is ground level or slightly below ground level.
Step 3:
Place some rocks in bottom of the hole for drainage.
Step 4:
Place the freezer into hole on its back. The door will open like a lid.
Step 5:
Fill around freezer with soil.
Step 6:
Place vegetables in freezer. Follow storage guidelines for vegetables just as if you were using a cellar.
Step 7:
Cover freezer with a sheet of plastic to keep water from freezing the lid shut.
Step 8:
Place bags of leaves or bales of hay or straw on top of the freezer to help with cold weather.

 Notes: Dig the hole one foot larger than the refrigerator on all sides to create drainage.  The refrigerator should sit just below ground level.  Line the hole with gravel or rocks.   Pour gravel in the space around the sides of the refrigerator.  Run a small vent pipe into the refrigerator for ventilation. Protect from water by covering the top with a large mat, board or other water resistant material.  Cover with bales of hay or straw to insulate. 

The amount of insulation will depend on your cold weather climate, so insulate accordingly, some will need more some less.

Looking for land in Missouri, Arkansas, Texas, or Minnesota in which to start your own homestead or garden in order to try out these new ideas?