Tuesday, December 18, 2012

Treasure of the Ozarks: Laura Ingalls Wilder Home to be Upgraded & Renovated for $2 Million!


Many of us are familiar with the books and the T.V Show "Little House on the Prairie" from Laura Ingalls Wilder, and according to "Greene" magazine, an Ozarks based and all about the Ozarks magazine, tells us that for about $2 million the Mansfield, Missouri historic home of the famous writer will be renovated and turned into a "historic home and museum" on Rocky Ridge Farm which will "assure the Wilder homestead its rightful legacy" states the author, George Freeman.  Tim Rosenbury, architect from Springfield, MO will be on the job for the renovation of the Rocky Ridge Farm.


Check out Laura's home on Rocky Ridge Farm!

If you're like many of us who long for the day to go back to the "simple" life of way back when and live much like the families within Laura's "Little House" books and are interested in homesteading on land with no building restrictions, or maybe you're looking to be the next Laura Ingalls Wilder let us help you with your source for inspiration!

Monday, December 10, 2012

Save Money by Saving Seeds: Here's How to Do It!


We're edging into the Winter months, but Spring is on the mind for those who are looking ahead at gardening and planting time, so here's some tips to keep in mind when growing your crops this coming up 2013 year for saving seeds for the future. You can save $ money $ and can make a little, too!

7 Reasons to Save Seeds:
  1. Money Savings. When you buy seeds, invest in high-quality seeds for the first planting, then you will have high quality seeds in a much higher volume to save, thus saving you more money in the long run.
  2. Seed Security. Instead of industry corporations who have discontinued some varieties of seeds to sell lucrative hybrid seeds, saving your own seeds gives you seed security in the fact that you control the supply of the seed variety you chose to plant, especially now hard to find seeds that aren't always available in the catalog (perhaps offer extra seeds to sell to other interested gardeners thus making you more money).
  3. Regional Adaption. When you save seeds grown on your land and in your climatic environment, you are developing over time, better adapted varieties best suited to your soil and climate conditions and growing practices.
  4. Consistent Quality: Corporations use open pollination in their seed crops, which means that their seed packets may contain several off-type seeds because they rarely rogue their fields for bad or poorly growing plants, which then pollinate and add to the seed crop. In saving your seeds and doing the picking, cleaning and hoeing yourself, you pull out the suckers, the weaker plants, etc and thus provide a more consistent pollination to your own seed crop that has better quality seeds each time you plant.
  5. The Joy of Learning.  The more seeds you save the more you learn about botany and the plant kingdom, this is a great thing for kids to get into especially for science projects!
  6. Explore Heirloom Varieties. Some people like to grow heirloom varieties because doing so gives them a connection to our garden heritage, others choose non-hybrid seeds because they don't want to support the industrial Agriculture system that is increasingly controlling our food supply and some older, open-pollinated varieties produce more nutritious crops than do modern hybrids bred mostly for high yields and long shelf life.
  7. Influence Crop Traits. Gene pools are incredibly elastic. By carefully observing your plants, you can save seed from those plants that best meet your needs for germination, ripening time, yield, specific fruit shape, flavor, storage, qualities, less seediness, better disease resistance, bloom color, or other unique trait within the variety of plant. Over time, most of the plants you grow from your saved seeds will end up having the desired traits you like.
Seed-Saving Tips
 

  • Always choose OP (Open-Pollinated) varieties for seed saving, these are non-hybrid plants with seed that's true generation after generation. (Self & Cross-Pollinating plants are OP)
  • The easiest crops to save seeds from are: peas, beans, tomatoes, and peppers (Self-Pollinators).
  • Cross-Pollinating crops need to be isolated from other varieties of the same species. The simplest solution is to grow only one variety of a given species and you can just save seeds from one or two plants, but to maintain long-term health and vigor, you should buy new seed every few years or trade seeds with other growers. Cross-Pollinating crops to save seeds from are: brassicas, corn, carrots, beets, squash, cucumbers, and melons.
  • Soak "wet" seeds, like Tomatoes and Squash which have a gel sac around the seeds that prevents germination, in order to remove the sacs and dry on a screen.
  • Seed crops are often harvested at different times than food crops, in order to keep your garden organized and track of which crop you want for seed, mark off the row with a ribbon or tie or other marker that you will know means a seed crop.
  • Flower heads are usually harvested as they dry.
  • Using screens as filters or rubbing seed pods between your hands is a couple ways to remove chaff from the seed.
  • Store seeds in glass jars, plastic bags or paper envelopes. Though glass is always best as it prevents moisture from getting to the seeds. (I have used baby food jars for small amounts of seed saving, but they are thoroughly washed, sterilized and dried before putting in the seeds).
  • Store seeds in a cool, dry place, ideally at less than 50 degrees Fahrenheit and at a relative humidity level of less than 50 %. In general, for every 10 degrees colder the storage conditions, seed longevity doubles, so it's best to keep seed in a covered container in a refrigerator. As long as the seed is very dry, it will last longest if you keep it in a freezer. All seed should be dried to a brittle state, ideally less than 14 % moisture (so ice crystals don't form on the seeds while in a freezer). When you're ready to use freezer stored seeds, allow the storage jar to come to room temperature before opening it to avoid condensation on the seed.

Cite:
**(Information acquired from Mother Earth News Magazine, December 2012/January 2013 edition, Article " Saving Seed 7 Reasons Why and Dozens of Tips for How" by Roberta Bailey pgs 38-44 )**

Monday, November 5, 2012

Homesteading in a Camper or Travel Trailer during Winter

I reviewed some online articles concerning how to homestead in a travel or camper trailer during the Winter to keep warm in about -9 degrees F, these helpful tips were gleaned from "The Tiny Voice of Reason"  and Homesteading Today's websites/forums.


026
    You can use hay bales as insulation for the skirting around your travel or camper trailer, however, keep in mind that the mice will be moving in and that hay is prone to spontaneously combust and is a fire hazard. Another form of insulation that would work would be creating a wind break by using permaculture, or various sized plants in pots or planted in the ground in various heights and staggering areas to create a barrier for the wind as wind is the main cause of heat loss during Winter, especially if you have no trees or are in an open area.

    Wood siding for sheds is a good skirting for campers and trailers for winter, consider adding foam board and heavy plastic to the underside of the trailer and over the crawlspace to conserve more heat and buff the cold winter winds. Also, get the vent cushions to cover your AC during winter, these are often found in RV stores or online.

   Buy some cheap shower curtain liners, fold them in half, cut to your window size and put them over the windows on the outside of the camper/trailer just to where they overlap the window frame (and if you have a patio door frame, do the same) and make sure to tape with outdoor heavy duty tape found at Home Depot or other hardware stores and also consider caulking with wet weather caulk on the interior of the camper/trailer where there's cracks, such as around the around the main doors, windows & closet seams where they meet the floor and use expanding foam to fill the areas around the floor seam of the popout if you have one.

rv homesteading
   Invest in Styrofoam insulation panels (12 pack for $8) from Home Depot and  put those inside the cabinets, closets, the storage space in the bedroom closet and under the sinks.  Under the tub, and that small space behind the toilet where the pipe sits in front, and stuff in fiberglass bats and make an inside cover with a square piece of Styrofoam insulation. Insulate your sinks as well!

    Put a wool blanket under your flat sheet on your bed, and consider layering two or three thick microfiber blankets on top for warmth when you sleep, also layer thin and thick blankets for your bed coverings, layers do wonders and if you don't have electricity, consider investing in a hot water bottle or pack, otherwise plug in that heating blanket!

    Put thermal curtains or blankets over your windows, open them while the sun is out for passive solar heating and close them up when it starts to get dark. Also, consider painting a few 2 Liter soda bottles black, fill them with water and let the sun heat them up during the day outside, bring them inside to let the warmth leach into the camper/trailer, if you find one or two isn't enough try a few more but larger water containers will take longer to heat up and may end up freezing and having the opposite effect instead.

Invest in a generator if money allows and stock up on fuel when it's the cheapest. Do not store fuel next to your camper/trailer, but in a safe area a good distance away in approved containers.

Some have installed wood stoves into their travel trailers, this can be a dangerous fire hazard and if you have one installed make sure that you have at least two fire distinguishers handy and never leave your camper/trailer unattended with a live fire in the wood stove.


Tuesday, October 30, 2012

Build a High-Protein Dispenser for FREE Chicken Food!

Found a nice little article that will help all those who have chickens, through the winter and the rest of the year saving you money by feeding natural, and high-protein, and FREE feed to your chickens with a little material found 'round the homestead or farm with a dollar or two thrown in for some minor materials.

The article I gleaned this info from is out of the "Countryside & Small Stock Journal" Vol 96 No. 6 November/December 2012, Page 61, by Jeff Hoard.

Basically the articles author explains how to create a maggot dispenser for your chickens using some simple materials:
  • Flat plywood- to put under dispenser to catch & feed chickens on a clean surface.
  • 5 gal. bucket with lid, bottom cut out but leave a 1" lip around it to hold a round piece of grate or heavy wire mesh.
  • Grate or Heavy Wire Mesh
  • Charge (dead animals, meat scraps, or raw fatty meat products. Don't use anything sick or dying.)
  • PVC Coupler
  • Long piece of ABS pipe
  • Auto Heater Vent Hose
  • Skirting-for little bird & wind barrier
  • Tools for cutting & Drilling
 The author goes on to explain how he put the dispenser together and how it works:

     "I mentioned ours being a deluxe model and I'll explain. The hanger/vent was made out of scrap pipe. At the top I inserted a long piece of ABS pipe. The horizontal hanger is another short pipe that is welded over a hole that I cut in the main vertical pipe. A little below that are two more short pieces of pipe in a v-shape that stick out on each side of the hanging bucket. These serve as bumpers. On the lid of the bucket, I inserted an appropriate sized PVC coupler and a piece of auto heater vent hose, which attaches from there up to the hanging pipe.  This is how the odor is vented up and out at the top of the long ABS pipe. Like the vent system, the "skirt" that was installed on the bucket is certainly not a necessity but does perform some added functions. first, it keeps smaller birds from hanging off the bottom trying to eat their fill. Second, the skirt serves as a wind catch. Third, as the chickens go for the maggots they hit the skirt to hopefully dislodge a few more. Fourth, it helps keep the charge from drying out (very important). I did drill one small hole in the center at the top of the bucket's lid to allow for moisture to be added onto the charge if needed. " (page 63)

The author continues with some tips, "Install the dispenser 20 ft away from the chicken house,  in the shade, this will help draw the flies away from the flock and the flies are immediately drawn to the charge. They then lay their larvae on the charge and the larvae then turn into maggots, hundreds at a time and as they grow larger they get heavier and eventually fall through the grate and onto the plywood below to be gobbled up by a waiting chicken. It usually takes about 5 days for the maggots to start dropping and as long as the charge is refreshed," there is a constant supply of high-protein feed for your chickens and it's free! Chickens can keep laying with this feed and greens for quite some time, without the need for corn scratch!

I scanned the image directly from the magazine in order to show you all what they've created and about how it'll look when finished. It's in pdf form so you will need Adobe PDF viewer to see the file>> PDF


Tips for the Cold & Flu Season without Meds

Got these helpful tips from webmd.com 

8 Tips to Treat Colds and Flu the 'Natural' Way

With no cure in sight for the cold or the flu, over-the-counter treatments can at best bring symptom relief or shorten the duration of those symptoms. Or you can take the natural approach. WebMD explores some home remedies that may help you feel better along the way.

No. 1: Blow Your Nose Often -- and the Right Way

It's important to blow your nose regularly when you have a cold rather than sniffling mucus back into your head. But when you blow hard, pressure can cause an earache. The best way to blow your nose: Press a finger over one nostril while you blow gently to clear the other. Wash your hands after blowing your nose.

No. 2: Stay Rested

Resting when you first come down with a cold or the flu helps your body direct its energy toward the immune battle. This battle taxes the body. So give it a little help by lying down under a blanket.

No. 3: Gargle

Gargling can moisten a sore throat and bring temporary relief. Try a teaspoon of salt dissolved in warm water, four times daily. To reduce the tickle in your throat, try an astringent gargle -- such as tea that contains tannin -- to tighten the membranes. Or use a thick, viscous gargle made with honey or a mixture of honey and apple cider vinegar, a popular folk remedy. Steep one tablespoon of raspberry leaves or lemon juice in two cups of hot water and mix in one teaspoon of honey. Let the mixture cool to room temperature before gargling. Honey should never be given to children less than 1 year old.

No. 4: Drink Hot Liquids

Hot liquids relieve nasal congestion, help prevent dehydration, and soothe the uncomfortably inflamed membranes that line your nose and throat.

No. 5: Take a Steamy Shower

Steamy showers moisturize your nasal passages and relax you. If you're dizzy from the flu, run a steamy shower while you sit on a chair nearby and take a sponge bath.

No. 6: Apply Hot or Cold Packs Around Your Congested Sinuses

Either temperature may help you feel more comfortable. You can buy reusable hot or cold packs at a drugstore. Or make your own. Take a damp washcloth and heat it for 55 seconds in a microwave (test the temperature first to make sure it's not scalding). Or take a small bag of frozen peas to use as a cold pack.

No. 7: Sleep With an Extra Pillow Under Your Head

This will help with the drainage of nasal passages. If the angle is too awkward, try placing the pillows between the mattress and the box springs to create a more gradual slope.

No. 8: Don't Fly Unless Necessary

There's no point adding stress to your already stressed-out upper respiratory system, and that's what the change in air pressure will do. Flying with cold or flu congestion can hurt your eardrums as a result of pressure changes during takeoff and landing. If you must fly, use a decongestant and carry a nasal spray with you to use just before takeoff and landing. Chewing gum and swallowing frequently can also help relieve pressure.
Remember, serious conditions can masquerade as the common cold and a mild infection can evolve into something more serious. If you have severe symptoms or are feeling sicker with each passing day, see a doctor.

Friday, October 19, 2012

Best MO Counties for Hunting Bucks as per Missouri Game & Fish Magazine!

Just found a wonderful spread in the Missouri Game & Fish Magazine about the Top Counties per Region in Buck Harvest for last year, which serves as a great forecast for this hunting season!

The article is on page 32-34 & continues on page 57 from the November 2012 issue.

For our area which is the Eastern Ozarks the top county is Texas, followed by Howell and then Wayne counties. The buck harvest for 2011 in Texas County was 1,987, Howell County 1,888 and Wayne County 1,477 that's a lot of bucks, mounts and deer chili for dinner! Now the article does go into the surrounding counties but I wanted to highlight on the areas where we have most of our owner financed land and hunting leases.


"This 17-county region [ Eastern Ozarks Region] came in fourth place out of eight regions in the estimated number of antlered deer with 52,681 bucks.  Hunters reported taking 20,112 antlered deer in this region last year, which also ranked it near top at second place statewide. The top three antlered buck harvest counties in were Texas 1,987 (first statewide); Howell 1,888 (second); and Wayne with 1,477 (11th). None of the 17 counties in this region are included in the APR zone. [Antler Point Restrictions]" (Missouri Game & Fish, "Missouri's 2012 Deer Outlook-Part 2 Finding Trophy Bucks" by Tony Kalna Jr, page 57)

The article continues to say that "a trophy buck can be killed just about anywhere in Missouri, but the numbers don't lie. Some counties and regions simply are better when it comes to having more bucks and more trophy-class bucks." So, this bodes well for this years hunting season, if you've been wondering where your next big buck and possible winner of the Boone and Crockett record breaker is, then why not come down into Howell and Texas counties here in the Missouri Ozarks and bag your next big break!

Tuesday, October 2, 2012

How to Salvage Junk and use it for your Garden as a Root Cellar or Veggie Storage!

You might be thinking, "I don't want junk in my garden, why would I salvage junk?!" 

      Well, let me explain, instead of going to the expense of putting in a cellar yourself, whether through paying for physical labor, the cost of cement, etc you can simply bury a large freezer that no longer works and putting straw, raked up leaves or other insulation material on top of tarp that covers the top of the freezer door, this helps keep out critters and keep your stored food insulated in the winter months, or perhaps you need something larger and assuming you have the space for it, ever consider making use of that old, broke-down school bus lying in the local junk yard by burying it up to the rear access doors? Voila, instant Root Cellar! What about that old galvanized trash can out back that's just taking up space, bury that and you have a great little covey for your root veggies, all you need is straw for insulation and it's already rodent-proof!

That get your attention?

 Good!

 Now let me delve further into the method to this madness.


 First off, be mindful of where you stash your garden treasure troves, preferably on the Northern side of your land or home and remember keep safety in mind, disable latches so kids or elderly don't get trapped in by accident.

Bury A School Bus!
http://4.bp.blogspot.com/-1jvcpEFQghE/T4bv1167SvI/AAAAAAAAELI/BHusD_GtZPs/s1600/root-cellar3.jpg


Consider burying a junked school bus, yes you will need to dig a proper sized hole and make sure that the bus is water tight (sealant or wrapping will be needed) and you will also have to allow for access to the rear doors and be sure to board up the windows and seal them for effective insulation. Also, you will need at least two PVC pipe vents for air flow as with any root cellar.

Bury Garbage Cans:
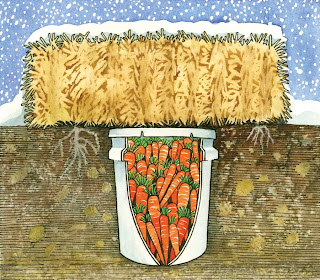


(Image from Mother Earth News )

    You can also use Garbage cans that are sealed or galvanized for smaller storage areas or land allotments, you simply need a can (cut the bottom out or poke holes for drainage), straw and a bit of dirt for the inside in order to place your winter squash and root veggies in, the straw will be used to cover the top of the lid of the trash can in order to insulate it- of course you will need to dig a hole big enough to stick your can into.

To access your veggies, simply remove the tarp (opt), straw bale, and lift off the lid (if you want an additional security from rodents and moisture, put black tarp down over the straw bale on top of the lid and make sure there are drainage ditches on either side of the can and secure the tarp with cement blocks or heavy rocks) and then snatch however many veggies you need for supper and replace your insulation!

Remember to layer leaves or straw between the veggies!


Figure 4. A well box that supports an access hatch above ground level
Here is a good article from Back Woods Home Magazine that shows you how to build a small cold storage bin.

 Bury a Freezer or Refrigerator:
 

Stuff You’ll Need:
Straw Bales
Clear Plastic Sheeting
Plastic Sheeting
Shovel and Pick
Old Deep-freeze Or Refrigerator

Step 1:
Remove motor, shelves and lock from door (so no child can get locked inside).
Step 2:
Dig a hole large enough to hold the deep freeze where the top of the freezer is ground level or slightly below ground level.
Step 3:
Place some rocks in bottom of the hole for drainage.
Step 4:
Place the freezer into hole on its back. The door will open like a lid.
Step 5:
Fill around freezer with soil.
Step 6:
Place vegetables in freezer. Follow storage guidelines for vegetables just as if you were using a cellar.
Step 7:
Cover freezer with a sheet of plastic to keep water from freezing the lid shut.
Step 8:
Place bags of leaves or bales of hay or straw on top of the freezer to help with cold weather.

 Notes: Dig the hole one foot larger than the refrigerator on all sides to create drainage.  The refrigerator should sit just below ground level.  Line the hole with gravel or rocks.   Pour gravel in the space around the sides of the refrigerator.  Run a small vent pipe into the refrigerator for ventilation. Protect from water by covering the top with a large mat, board or other water resistant material.  Cover with bales of hay or straw to insulate. 

The amount of insulation will depend on your cold weather climate, so insulate accordingly, some will need more some less.

Looking for land in Missouri, Arkansas, Texas, or Minnesota in which to start your own homestead or garden in order to try out these new ideas?