Monday, August 19, 2013

Duck eggs vs Chicken eggs


Duck Eggs Vs Chicken Eggs: easily distinguishable, a considerably longer shelf life

Duck eggs are quite large compared to chicken eggs, which makes them easily distinguishable. Another distinct difference is that the duck egg's shell is a lot tougher than a normal chicken egg's shell. Though that makes them a lot more difficult to crack, it is also supposed to provide them with a considerably longer shelf life. By long, I mean six weeks at maximum, if you keep them refrigerated.
The large size of the duck egg gives it a larger yoke to white ratio than a chicken egg. So if you want more yoke, duck eggs are what you should go for. With the larger size you definitely get more for your money, compared to a chicken egg!


Duck Eggs Vs Chicken Eggs: Nutrition

6x the Vitamin D, 2x the Vitamin A, and 2x the cholesterol in duck eggs vs chicken eggs. Duck contains about 75% of the Vitamin E in chicken eggs. Duck eggs reportedly also have more Vitamin K2, Duck eggs also are higher in calories for the same weight quantity, probably due to it's slightly higher fat concentration. Also, keep in mind that the eggs of free-range, pastured animals generally have higher levels of vitamins and higher levels of omega-3 fatty acids. The yolks are darker, yellower, indicating a higher nutrient density.
A 100 gm of duck egg will provide about 185 KCal of energy, compared to 149 KCal of energy provided by a chicken egg. Both types of eggs, match each other in terms of carbohydrate content, while the protein content is slightly higher in the duck eggs compared to chicken eggs. The mineral content of duck eggs is very similar. Both contain selenium, manganese, zinc, copper, potassium, sodium, phosphorus, calcium and iron. The duck eggs contain slightly higher amounts of all these minerals.
Same is the case with vitamin content in both of them. The vitamin content too is similar, but duck eggs have a higher amount of each one of them, which includes thiamin, niacin, riboflavin, pantothenic acid, folate, vitamin B6, vitamin D, vitamin E, vitamin A, vitamin B12 and retinol.
100 gm of duck eggs will have about 3.68 gm of saturated fat, compared to 3.1 gm in chicken eggs. The mono unsaturated fat content is about 50% more in duck eggs as against chicken eggs. The amino acid content profile is also similar for both eggs, but again duck eggs contain more of them. The amino acids included are threonine, isoleucine, trytophan, leucine, methionine, lysine, cystine, tyrosine, phenylalanine, valine, serine, glycine, proline, aspartic acid, histidine, alanine, and arginine. The only minus point that duck eggs have is the considerably higher cholesterol content, compared to chicken eggs. 100 gm of duck eggs will contain 884 mg of cholesterol, compared to 425 mg in chicken eggs. That is why, people with history of heart disease should stay away from consuming duck eggs or moderate their intake.


Monday, August 5, 2013

How To Use Crayons As Candles


If you have kids, you likely have crayons! If you don’t have any candles in an emergency or when the power’s out, you can adapt and use some crayons as candles.
This couldn't be simpler really -
  • Firstly you need some crayons; the non-toxic ones are best, although I am guessing that most are non-toxic these days. You then want a fireproof base to stand the crayon/candle on, a small plate works well.
  • Use a match or lighter to melt some wax off the top of the crayon and drip it on the plate (see the photo), and stick the base of the crayon to the plate to hold it safe and secure in the upright position.
  • Once the crayon is stuck to the plate (or whatever you are using for the base), simply light the top of the crayon. IMPORTANT – you have to wait until the paper sleeve catches, as it is the sleeve which acts as the wick and enables the crayon to burn like a candle.
The standard sized crayons burn for around half and hour; I haven’t tried the chunkier larger crayons, but I would assume they will burn much longer.
If you are a prepper or you take the kids camping/hiking etc, it wouldn’t be a bad idea to keep a pack of crayons in the pack.  They are great for keeping the kids entertained and they are a backup light source, AND they make great emergency fire-starters.


Friday, August 2, 2013

5 Herbs That Repel Flies


With warm weather in the air, we are all looking forward to grilling out, swimming pools, sun bathing, and just generally spending time outdoors. We’ve waited all winter for spring to get here. But those first few really warm days always greet us with an unpleasant, little problem.
Bugs! The warm weather brings out the bathing suits and suntan lotion, but it also brings out the pests! Mosquitos, ants, yellow jackets, and the grossest of all: flies! Flies are everywhere in the summer. Nothing ruins a good picnic quicker than flies covering the hotdogs! Most people will turn to harsh, chemical solutions this summer to try and solve this most annoying problem.

But what if you have kids around, or pets? Maybe you just don’t want to be surrounded by chemicals all summer. If you are one of the every growing number of people that wish to find a safer, more natural answer, then maybe this article will let you in on a few all natural tricks to repel the flies this summer.
Don’t underestimate the power of these natural alternatives to chemical pest control. Many of these herbal remedies are just as effective, if not more effective, than their chemical rivals on the store shelves. You should, however, use caution if any member of your family has an allergy to any of these herbs or if someone who spends significant time at your home has an allergy to these items. A little commonsense and a little research should have you well on your way to naturally controlling the flies at your home this summer.
Most people don’t realize how many all natural remedies there are for everyday problems, so they just reach for whatever chemical product is being sold. Did you know that there are many herbs that just naturally repel flies?

1. Basil

Anyone that knows anything about herbs knows that basil is great for cooking. It’s easy to grow and smells heavenly! Humans love Basil. But guess who hates, Basil? House flies. House flies are absolutely repelled by Basil. The best way to use this all natural remedy is to plant Basil by you external doorways. If you have a large outdoor picnic area, try using small planters of Basil on your picnic tables. You are serving two purposes at once. While grilling out you can easily access your Basil for cooking, and the flies will stay far away during your lovely, summer meal.

2. Bay Leaves

This is another herb loved by cooks worldwide. Nothing puts the finishing touch on a big pot roast like a few bay leaves thrown in. But once again, as much as we love it, flies hate it. Other insects hate it as well like earwigs and weevils, to name a few. Keep these herbs growing nearby to discourage pesky pests.

3. Lavender

Lavender is the ultimate herb for relaxation. The calming, soothing smell can really make a bubble bath a true spa experience. People have been using lavender for centuries to make their homes and clothing smell sweet. It is also used in quite a bit of cooking as well. Flies aren’t impressed with lavender, though. Hang some dried lavender decoratively around your home to keep away those buzzing buggers!

4. Tansy

Tansy is not as well-known as some of the other herbs we’ve listed here. Tansy was used in ancient times as a strewing herb because it was believed to have cleansing properties. Tansy is a nice foundation plant for household landscaping as it looks very similar to marigolds. Tansy has the added benefit that it repels flies, though. Flies are not the only pests that find Tansy repellant. Ants, fleas and moths will also stay clear if this plant is around. An extra bonus is that this plant will even discourage mice from hanging around.

5. Pennyroyal

This may be one of the most versatile of herbs. This member of the mint family repels flies, mosquitoes and fleas. However, when planted on your property, and specifically around the foundation of your home, this interesting herb can help ward off mice and ants as well! Instead of killing two birds with one stone you’ll be repelling five pests with one herb! You should use caution if you choose to plant this herb around your home, however. Pennyroyal is dangerous when consumed, even in small amounts.

Clean and Green

When you choose a more natural path in your home, you can have more peace of mind that your family will be safe from harmful chemicals and strange side effects. People don’t realize that there is almost always a natural alternative to chemical solutions when it comes to pest control, cleaning supplies, and many other household items. A little research and attention can go a long way to preserving your families’ health this summer.

Friday, July 26, 2013

Raising Laying Hens From Chicks: A Step By Step Guide

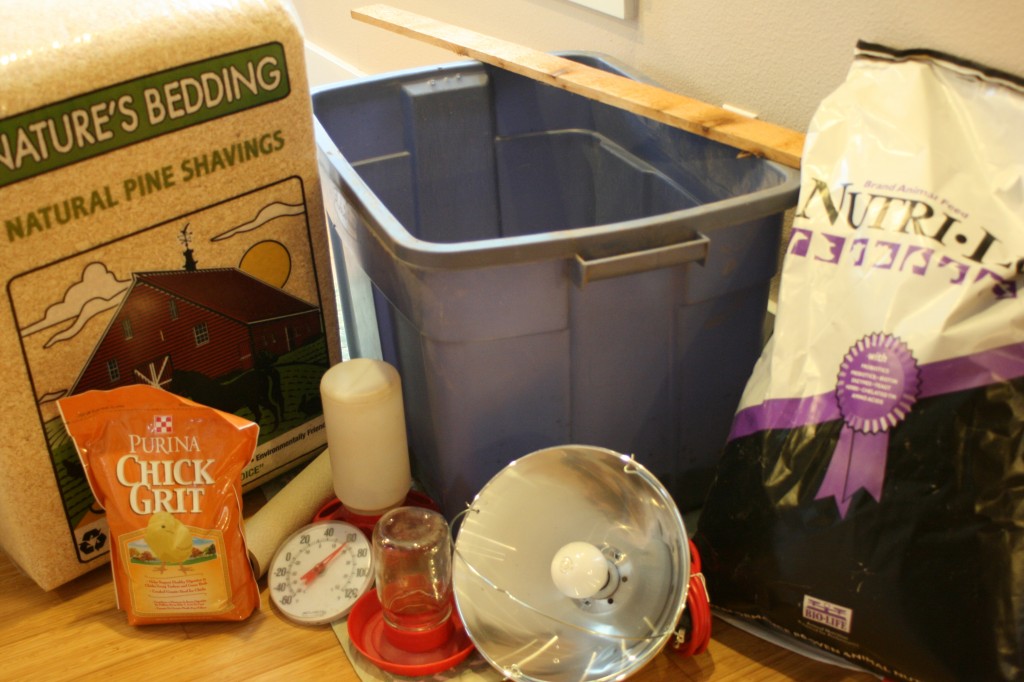
STEP ONE: Things To Gather BEFORE your chicks arrive.  Yes.  BEFORE.

1) A brooding box/pen/cage.  You can start with a big plastic tub for 25 chicks, which they’ll outgrow in a week.  It can be used  to hold 40-50 pound bags of feed later.  If you have 3-6 you can keep them here for a 2-3 weeks.


2) Chick feed.  It is important to feed your chicks food intended for chicks and not adult birds.

3) Chick grit.  Chickens typically consume dirt and pebbles as they eat, and these are necessary to help break down their food.  Since chicks are not outside for the first 5 weeks (in our case more like 6-8 since we get them in December) they need grit as a supplement added to their food.  Adult birds that are not raised outside will continue to need a grit supplement.

4) Pine shavings or equivalent. Avoid hardwood shavings like oak, as they can be toxic to chicks.  Avoid shredded newspaper, too, though some people use it.  The ink will dirty your chicks, and it seems an unsatisfying bedding choice for new chicks.

5) Paper towels (non-bleached, plain) for the first 2 days.  If you use newspaper be sure to shred it or chicks will slip on the surface.  Slipping is problematic for proper foot development, so go with paper towels.

6) Water and food dispensers.  Those pictured are specifically for chicks.  They will need something bigger in about 5 weeks.  Though again, if you only have three or four birds, the watering can pictured could work if you swap out a quart jar, but even with a quart jar you’ll have to fill it frequently.

7) Light with a 100 watt bulb if chicks will start in your home somewhere (a laundry room works well), or some heated area.  Otherwise, get a heat lamp as well as a white light.  If you plan to put them in your garage in early spring, you will still want a heat lamp.

8) Thermometer (not essential, but handy).

STEP TWO: Set up before the chicks arrive

1) Place about 1/2 inch of shavings in the bottom of your brood space and cover with one layer of paper towels. If you have a cage, lay a plastic bag or old shower curtain down to protect the floor.  With our tub we put an old towel down.  Partly it marks off chick space from other space.  Consider “chick space” dirty. That is, hands should be washed well after entering “chick space”….

2) Put the filled feeder and water directly on the bottom of your brood area for a day.  Once the chicks are actively eating and drinking, put a block of wood under the feed and water to raise them a bit.  This will keep them cleaner. Separating the water and feed will also help keep both cleaner.

3) If chicks are brand new–that is, they have not had anything to eat or drink yet (most likely if they have been mailed to you), then mix 1/4 c. sugar with a 1 quart of warm water to dissolve.  Use this water the first couple of days.  The sugar will give the hungry and thirsty chicks an energy boost, and they’ll be inclined to drink because–well, sugar water is just SO tasty!  After the second day use tap water.  If chicks come from a farm and feed type store and are at least a few days old you can omit the sugar water.


STEP THREE: When Chicks Come Home

1) If the chicks have come in the mail they will be stressed, thirsty, and cold.  So take them out of the box one at a time, dip their beak in your sugar water and set them down by the water.  I keep the feed next to the water the first couple of days to be sure they find them both.  You may need to dunk their beaks in the food too, if they aren’t finding it.  Check them periodically to be sure they are eating and drinking.  Occasionally you’ll need to double dip (I think of this as a baptizing of sorts–calling these chicks to life…) a chick who only wants to sleep.  BUT sleeping is what they will do a lot the first couple of days.

If the chicks are coming from Wilco (or equivalent), they will be excited to explore their new area, and all you need to do is show them the water and feed.  They will likely find them on their own, but set them down in front of it regardless, especially if your feeder looks different from the one in the store.

2) Hang your white light over the brood box. We put a screen on top of our tub and set the light on the screen–you can figure out another system, but you will want to cover the brood box by week 3.  Follow these guidelines for temperature:
The first week keep the area beneath the light between 90-95.  Every week decrease that 5 degrees by raising the light about 3 inches.  By week five you’ll be at about 75 degrees, and depending on time of year, may not need a light anymore.  If it is winter, keep their space above 60 at night for another few weeks until their chick fluff is fully replaced by feathers.

Chicks will communicate whether they are too hot or too cold by how they cluster.  They will be inclined to collapse into a pile to sleep, but if they spend nearly all the time heaped up under the light they are too cold. If they are spread out away from the light they are too hot.  If they are panting, they are too hot. In those cases, raise the light, or if you are using a heat lamp, switch to a 100 watt white bulb. This is why a thermometer is optional.  Chicks communicate very well.  Especially at this stage.

STEP FOUR: Things to Check in the First Week:

1) Observe to see that they are all drinking and eating. Feel free to hold them, but not overly much the first week.  But handle them after that if you want hens that will tolerate petting!  Certain breeds are also more amenable to petting than others.

2) When you pick them up, check their vent to be sure it is not plugged with poop.  (Anatomy lesson: the vent is used for everything: pee-poop–urine and feces are mixed for chickens, and egg.  Maybe disgusting, but true.)  We only had this happen with one shipment–which arrived in bad shape.  We lost five of the chicks in the first 24 hours, and about 5 of them had plugged vents over the first week.  To clear, soak their bum in a small bowl/container of warm (not hot) water.  Try not to get any more of the chick wet than is necessary.  The poop plug will soften so that you can scrap it away gently.  Dry chick and immediately put back in warm brood box.  I used a yogurt container which I then recycled.  THIS BEARS REPEATING: ALWAYS WASH YOUR HANDS AFTER HANDLING YOUR CHICKS. Not only when you’ve been cleaning pasty butts!

3) Turn off the white light every day 2-4 times for about 20 minutes at a time so they are not constantly under white lights.  Imagine if you had to live and sleep under a bright white light 24/7…!

4) Add chick grit to the feed after the first few days. Mix your feed and grit together at this point.  The ratio of feed to grit is 20:1.  So 20 pounds of feed mixed with 1 pound of grit will keep you from having to make the calculation every time you feed them.

5) You’ll change the paper towels a couple of times a day the first day or two on account of the poop.  Once you stop using paper towels, add new shavings on top of the old ones every few days as needed. If you are using a heat lamp you’ll notice the lamp dries the poop and reduces the smell.  If you are using a white lamp, you will likely want to replace the shavings every few days.  When the smell is strong–it’s time to replace them.  For your sake, but also for the chick’s health.

STEP FIVE: Things to Do in Week Two or Three:


Mostly Continue what you’ve been doing, but you will notice they will muck up their water (so change it frequently–and depending on how many chicks you have, you might want to graduate to a quart jar for water), and you’ll be surprised how quickly they will go through feed.

Clean their water jar at least once a week with a vinegar/water solution.  You’ll notice it gets to feeling slimy, and vinegar will keep it clean.

By the end of week two move  birds to a bigger space.  So add a heat lamp at that point, and leave both a heat lamp and a white light on during the day, and then turn off the white light at night. If you just have 3-4 chicks you’ll likely be able to keep them in your original space for the full 5-6 weeks unless the smell drives them or you out of the house!  Better them than you!  Since it takes five to six weeks for them to get their warmer set of feathers, heat continues to be an issue even after they appear  to be awkward gawky teenagers.


Add clean shavings every few days on top of the old ones.  As they get older (and more feathered) Open up a space for them to see into the garage, and eventually open the front up most of the way during the days before we move them from here to the hen house.

http://www.survivalistdaily.com/raising-laying-hens/


Monday, July 22, 2013

10 Uses for Aloe Vera Gel or Juice

10 Uses for Aloe Vera Gel or Juice


1. Itch relief: Apply directly to the site of insect bites or stings for relief.
2. Burn relief: Slather pure aloe vera gel on a sunburn, or use to treat minor burns in the kitchen. It can also be effectively used as a gentle aftershave.
3. Leave in conditioner/scalp soother: I mix aloe vera gel with a little rosemary essential oil and a few drops of Vitamin E oil, squirt tiny bits on my scalp and ends of hair. I do not rinse, and this mixture soothes an itchy scalp and softens hair.
4. Hair styling: Aloe vera gel fights frizz in my hair and has been a great replacement for expensive styling products.
5. Mouthwash: If drinking aloe vera juice, you can simply swish it around in your mouth for a while to benefit gums. You can also make a homemade aloe mouthwash by mixing 1 cup aloe vera juice, ½ cup distilled water, 2 teaspoons baking soda, and 10-20 drops of peppermint essential oil.
6. Hand sanitizer: I make an aloe-based natural hand sanitizer  that travels with me almost everywhere. The aloe vera gel in it moisturizes my hands instead of drying like most commercial hand sanitizers.
7. Moisturizer: Skin absorbs it quickly and it’s non-greasy. I find it to be the perfect summer facial moisturizer when other moisturizers just seem too heavy and oily.
8. Drink for digestionAloe vera juice can be effective in aiding digestion, soothing an upset stomach, and providing relief for heartburn.
9. Vitamin absorption: A recent study from the University of California, Davis, showed that aloe vera may help your body absorb vitamins more effectively. Drinking 2 ounces of aloe vera juice along with your daily vitamins can increase absorption rates.
10. Drink to lower cholesterol: I’m not suggesting anyone ignore the advice of their medical professional, or stop taking cholesterol-lowering drugs. However, this one is definitely worth a look. Studies have shown that drinking aloe vera juice can safely lower cholesterol over time.
Disclaimer: I am not a health professional. Keep in mind this information is based on my personal opinion and research. Use these recommendations at your own risk. I recommend consulting with your health practitioner prior to taking aloe vera internally.

http://www.diynatural.com/10-uses-for-aloe-vera/

Tuesday, July 16, 2013

Stylish way to get rid of mosquitoes

GREAT IDEA!! FOR BACKYARD FUN, NO BUGS!!


All you need is a package of Mason jars, some cotton string and some liquid citronella (find it in big jugs at any home-improvement store and even some grocery stores). Use a hammer and nail to poke a hole in the top of the lid, then pour in the citronella, put the top on and drop in the wick. Allow the string about 10 minutes to soak up some oil, then place them around your backyard and light them!