
Showing posts with label compost. Show all posts
Showing posts with label compost. Show all posts
Monday, July 15, 2013

Tuesday, July 2, 2013
Living Fences: How-To, Advantages and Tips
Living Fences: How-To, Advantages and Tips
Sustainable living fences can hold animals, protect soil, provide livestock fodder, offer food or compost, and will last generations.
A living fence is a permanent hedge tight enough and tough enough to serve almost any of the functions of a manufactured fence, but it offers agricultural and biological services a manufactured fence cannot. For instance, it provides “edge habitat” that supports ecological diversity. As more species (insects, spiders, toads, snakes, birds and mammals) find food and refuge in this habitat, natural balances emerge, yielding, for example, a reduction of rodents and crop-damaging insect populations.
Read more: http://goo.gl/K4TK7
Best of Mother Earth News: Build It Yourself: http://amzn.to/150XZmz

Sustainable living fences can hold animals, protect soil, provide livestock fodder, offer food or compost, and will last generations.
A living fence is a permanent hedge tight enough and tough enough to serve almost any of the functions of a manufactured fence, but it offers agricultural and biological services a manufactured fence cannot. For instance, it provides “edge habitat” that supports ecological diversity. As more species (insects, spiders, toads, snakes, birds and mammals) find food and refuge in this habitat, natural balances emerge, yielding, for example, a reduction of rodents and crop-damaging insect populations.
Read more: http://goo.gl/K4TK7
Best of Mother Earth News: Build It Yourself: http://amzn.to/150XZmz

Thursday, April 11, 2013
Health benefits of fully ripe bananas
Health benefits of fully ripe bananas:
"According to Japanese Scientific Research, fully ripe bananas with dark patches on yellow skin produce a substance called TNF (Tumor Necrosis Factor) which has the ability to combat abnormal cells. The more darker patches it has the higher will be its immunity enhancement quality; Hence, the riper the banana the better the anti-cancer quality. Yellow skin banana with dark spots on it is 8x more effective in enhancing the property of white blood cells than green skin version. Eating 1-2 banana/s a day increases immunity."

Wednesday, April 3, 2013
The Benefits of Vertical Gardening
What Is Vertical Gardening?
Simply put, vertical gardening is the practice of growing certain vegetable plants up a support to keep them from spreading on the ground. Most vining plants, such as cucumbers, can be grown vertically using a trellis. Growing these plants vertically saves space, and generally promotes more vigorous growth.

The Benefits of Vertical Gardening
As mentioned above, growing plants vertically saves space in the vegetable garden. You can grow more plants in a smaller area by using vertical gardening practices. A plant that would normally take up 4 square feet spread across the vegetable garden, will only take up 2 square feet if vertical gardening is used.
Vertical gardening can also greatly improve your crop production. Keeping vegetable plants off the soil will help prevent soil-borne diseases, and may limit the chances of rotten fruit. If vegetables are allowed to lay on the soil, they can begin rotting on the bottom side due to excessive moisture.
Growing some vining plants up a support also reduces the risk of powdery mildew, and other mildews, by improving the air circulation around the plants. This will also improve access to blooms for bees and other pollinators. Vertical gardening can greatly improve the overall appearance of your garden, because spreading plants will not look so unwieldy.
Thursday, March 28, 2013
Start a 1 Acre Self-Sufficient Homestead
We wanted to share this great information from Mother Earth News on how to start a 1 Acre Homestead. There are some great ideas here.
We have the land for sale. All it needs is you! Contact us Today!
Your 1-acre homestead can be divided into land for raising livestock and a garden for raising fruits, vegetables, plus some grain and forage crops.

Everyone will have a different approach to keeping a self-sufficient homestead, and it’s unlikely that any two 1-acre farms will follow the same plan or methods or agree completely on how to homestead. Some people like cows; other people are afraid of them. Some people like goats; other people cannot keep them out of the garden. Some people will not slaughter animals and have to sell their surplus stock off to people who will kill them; others will not sell surplus stock off at all because they know that the animals will be killed; and still others will slaughter their own animals to provide their family with healthy meat.
Read more: http://www.motherearthnews.com/modern-homesteading/self-sufficient-homestead-zm0z11zkon.aspx#ixzz2Or9G0TxS
Thursday, March 21, 2013
Compost Bin
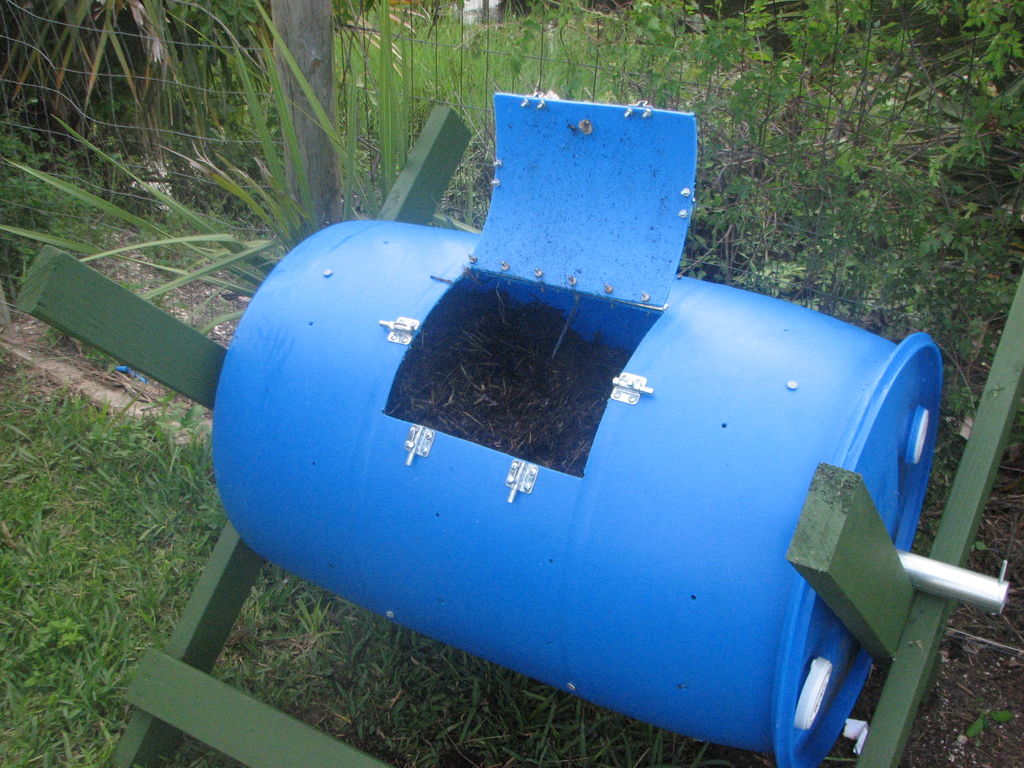
Compost Bin
by ic517
www.instructables.com
Step 1: Materials
3 2x4 x 8 pressure treated
1 galvinized chain link fence post
4 3.5inch 1/4 bolts with washers and nuts
6 or 8 6" 60d nails
one 55 gal barrel (must be food grade)
4 latches
one piano hinge
one box of 10-32 3/4" nuts and bolts ( make sure they fit your hinges and latches)
paint if you want . I use barn paint from tractor supply co . its cheap and it doesn't require primer!
now I bought most of my materials but you can use what ever you have on hand also. the whole project only cost me 50 dollars so its not that expensive any way
1 galvinized chain link fence post
4 3.5inch 1/4 bolts with washers and nuts
6 or 8 6" 60d nails
one 55 gal barrel (must be food grade)
4 latches
one piano hinge
one box of 10-32 3/4" nuts and bolts ( make sure they fit your hinges and latches)
paint if you want . I use barn paint from tractor supply co . its cheap and it doesn't require primer!
now I bought most of my materials but you can use what ever you have on hand also. the whole project only cost me 50 dollars so its not that expensive any way

Step 2: Assembly
First cut 2x4s in half
take 2 2x4s measure and make a mark half way down both of them . then center them and bolt ( you can use nails but bolts work better) them together.
repeat for other side.
you should have two giant X's
it doesn't matter which way they go,so pick one side as the bottom measure up 3 inches from each foot for the bottom braces.
now attach your other 2 boards with nails or screw them together.
your frame is now done and you can start to work on the barrel.
you can cut your bottom braces a few inches longer than the barrel for a better fit but you don't have to.
take 2 2x4s measure and make a mark half way down both of them . then center them and bolt ( you can use nails but bolts work better) them together.
repeat for other side.
you should have two giant X's
it doesn't matter which way they go,so pick one side as the bottom measure up 3 inches from each foot for the bottom braces.
now attach your other 2 boards with nails or screw them together.
your frame is now done and you can start to work on the barrel.
you can cut your bottom braces a few inches longer than the barrel for a better fit but you don't have to.

Step 3: Post hole
now get a hole saw to match your post and drill in the center of each end of the barrel.drill a hole and put a bolt through the end to keep it from sliding off the frame. you'll also need to trim the post to length.
.
Step 4: The lid
This is the most difficult part of the whole project take your time to cut , drill and line everything up.
I use 4 latches because the heat from the compost can warp the lid and the plastic is somewhat flexible anyway. the piano hinge adds stability also. start by marking the door out. I used a carpenters pencils , its a little hard to mark mark on the plastic.
then drill 4 1/4" holes in the corners.
cut out door with a jig saw . i made mine big enough for my shovel the fit in just use good judgement and dont make it to big or small.
first drill and bolt the hinge to the barrels first.
now drill and bolt the lid on . drill two holes and bolt them together first just on case they don't line up. the drill bit will try to slip on the plastic so start your drill slowly.
make a handle out of what ever , a simple finger hole would work.
now drill and attach the bolt side of the latch first then slid bolt open and use it to line up bolt reciever. close each bolt when you go to install the next one so the stay lined up. take your time aand it should be ok
I use 4 latches because the heat from the compost can warp the lid and the plastic is somewhat flexible anyway. the piano hinge adds stability also. start by marking the door out. I used a carpenters pencils , its a little hard to mark mark on the plastic.
then drill 4 1/4" holes in the corners.
cut out door with a jig saw . i made mine big enough for my shovel the fit in just use good judgement and dont make it to big or small.
first drill and bolt the hinge to the barrels first.
now drill and bolt the lid on . drill two holes and bolt them together first just on case they don't line up. the drill bit will try to slip on the plastic so start your drill slowly.
make a handle out of what ever , a simple finger hole would work.
now drill and attach the bolt side of the latch first then slid bolt open and use it to line up bolt reciever. close each bolt when you go to install the next one so the stay lined up. take your time aand it should be ok

Step 5: Ventilation holes
on the opposite side of barrel from the lid mark off 4 evenly spaced 1/4 holes across the barrel.then measure 6 inches down from each hole till you all gone all the way around. just make sure it has some ventilation. this would be a minimal amount . Now randomly drill some hole for the spikes . drill a hole a little small than the spike and just nail them in. these help brake up the material when you rotate the barrel speeding up the composting. You should use 4 to 8 spikes what ever works best . you can always pull them out.
Step 6: Add compost!!!!
the only other thing you could do is paint it black . they make paint that will stick to plastic. I live in south Florida so that's really not necessary but if you live in northern climates you might need to find a good sunny spot and place it there! the advantages of this barrel composer are quite a few. its quick, cheap and effective. no bugs or rats, almost no odor. you can use it in a very small yard and not bother the neighbors.
I square foot garden ( mel is a genius ) and buying fertilizer and compost can add a lot of expense you don't need. I save a lot of money growing my own food and you would amazed how much food you can grow this way .good compost can double your harvest!
I square foot garden ( mel is a genius ) and buying fertilizer and compost can add a lot of expense you don't need. I save a lot of money growing my own food and you would amazed how much food you can grow this way .good compost can double your harvest!
Friday, January 25, 2013
Ozarks Gardening Made Easy with Raised Beds! (How-To)
Materials for a raised garden bed
- One 6-foot-long 4-by-4 ($15) (Cedar or Redwood is best for rot resistance & Aesthetics)
- Six 8-foot-long 2-by-6s ($75) (Cedar or Redwood is best for rot resistance & Aesthetics)
- 32 3½-inch #14 wood screws and 16 ½-inch #8 wood screws ($29)
- One 4- by 10-foot roll of ¼-inch-mesh hardware cloth ($15)
- 32 cubic feet (1 1/5 cu. yd.) planting mix ($25 in bulk or $100 in bags)
Everyone in the Ozarks knows that when you're out to garden you best get ready to do a lot of "rock" gardening, because our earth is so rough & tumble full of clay, rock and sand that it's hard to get good crops out of it unless you take years or many dollars worth of top soil, manure and compost to get it worth planting in. (Not counting tomatoes which seem to love our soil type & as does our native flora).
The above materials should be enough to create one raised bed (see our previous blog post on how to make an insulated raised garden bed.)

With a table or power saw, cut the 4-by-4 into four 16-inch-tall corner posts. Cut two of the 2-by-6s in half. Cut the 1-inch PVC pipe into four 12-inch-long pieces and the ½-inch PVC pipes into 6-foot-long pieces. Assemble pieces on a hard, flat surface by nailing/drilling the 2-by-6's and their halves to the four corner posts you cut to make a approx. 8 ft long box. After marking off an area and placing the box where you want it to be in your garden, place the cloth (or chicken wire) on the ground to keep out moles, then fill the bed with a good healthy mix of soil (home mixes that are comprised of compost such as manure, leaves, veggie/fruit leavings are excellent- Goat, Rabbit, Horse & Donkey manure are great for this.) to where it's just about 1-1.5" from the top of the boards. You should be able to get about 6 rows of leaf lettuce out of each box, but the needs of each crop you intend to plant will vary in spacing requirements for a good healthy harvest. (Allot space for poles or supports for beans, tomatoes, etc).
Click Here For a Visual Step-By-Step on how to assemble a raised bed.
Some design ideas we found online: (good to doodle these out during Winter to help get organized for Spring!)
Remember, if you want a custom and different design your materials will change compared to what we've shown above, so allot for the changes for your own design.


Subscribe to:
Posts (Atom)